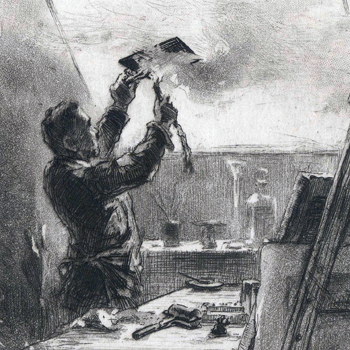
The earliest
illustrations of church monuments were produced by
intaglio printing; these are also the most
beautiful. This, of course, was well before the
invention of photography and the first stage involved
drawing by pencil the monument in the church, sometimes
a very difficult task in itself and I greatly
admire the artists who undertook this skillful
work. The image is then transferred onto a metal
plate by creating a number of lines or dots cut
into this plate, the various tones being created
by varying the depth of the line and by cross
hatching. There are other methods and one of
these will be briefly mentioned below. The plate
is then inked and passed though a press to
produce a print. The plate is then
cleaned, reinked and another print made, although eventually the
plate will begin to show signs of wear. Different
artists may be involved in the different processes of
this work.
Can you see a problem here? The image on the
plate has to be drawn in reverse otherwise the resulting print
will itself be reversed. However there are ways around
this problem, obviously, but I will not describe the
minutia here. Three methods of producing the plate will be
described below.
The prints made by intaglio printing are
often loosely - although incorrectly - called
etchings; this latter term, in fact, refers to just
one of several processes by which prints
can be made.
Etching, engraving and
aquatint will be described here but there
are others such as
dry point and
mezzotint; readers of ghost story writer M.
R. James will be familiar with the last term.
There are intaglio processes on other materials,
such as
woodcuts and
wood engravings
but
these will not be described here.
Engraving
 In this process
 the lines are cut
directly into the metal plate (a steel plate, in the example shown
on the right) by using a tool called a
burin
(left).
The depth of the line is controlled simply by
engraving it more deeply but the direction of the line
is changed by rotating the plate not the
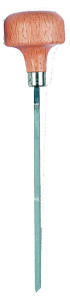
direction of the burin.. A burin as shown, as may be deduced,
has a wooden handle
which is held in the palm of the hand; a number
of different blades are available. This is very
skillful work and a very lengthy process, taking
days, weeks or even months to complete a
plate. Woe betide you should you make a mistake: you
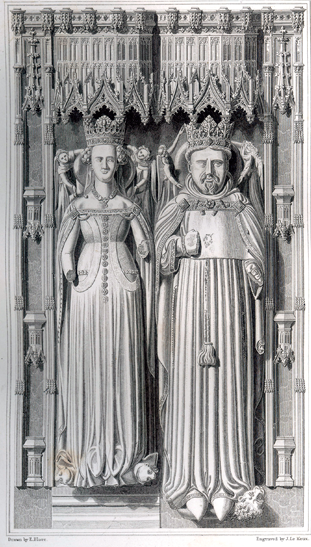
just do not! However the results are truly magnificent:
look at the engraving of King Henry IV and his Queen,
Joan of Navarre, from Canterbury Cathedral on the right. Here the drawing was
executed by architect
Edward Blore, which was a major achievement in itself
and if you are familiar with this monument you will,
like I am, be baffled by how on earth he managed to do it!
As is sometimes the case the another hand carried out
the engraving: here it was
John Henry Le Keux. I certainly admire the skill and
dedication of
these Victorian gentlemen.
I have never attempted engraving and, because I
do not have the skill to do so, the time to develop
that skill, nor a master to teach me, I almost certainly never will. I
have tried to use a burin on softer copper plate which was
easy enough, but to execute a full detailed plate is
certainly another matter.
The plate then has to be printed and this process
will be described below in the
etching
section. Etching was introduced because the
process is speedier and more forgiving than
engraving.
Etching
 The term etching
strictly refers to the process of cutting the very fine lines in a
metal plate by a chemical process, rather than cutting
them directly with a burin, as is
done
in engraving. As
mentioned above the
finished image, often
called simply an etching, is strictly
a print.
The plates are made of copper, zinc or occasionally
other metals and
the chemicals used - called the
etchant - are
nitric acid, ferric cholide and or, again,
occasionally other chemicals. I use copper
because of its beautiful colour and because it
was used by etchers in the past; ferric chloride
because it is a powder one dissolves in water and this can
be easily sent through the pos. Suppliers and the post
office are probably
more reluctant to send concentrated nitric acid by a similar method!
The
first stage is to clean and degrease the copper
plate otherwise the ground will not stick. The
ground
is a waxy like substance which is melted onto the
plate while it lies on a hot bed which is heated by gas or
electricity. Then this layer of this ground is
rolled so that it is absolutely even. The ground is to
prevent the etchant biting into the plate: you
will soon be 'scratching' through the ground (a
process called
needling), so exposing
the underlying copper and this is the first
stage in creating the actual image. The back of the plate
may already be covered in a resistant layer but, if
not, a liquid ground or varnish must painted on to
prevent the etchant from biting the
copper on the back of the plate.
Next you
smoke the ground by holding the
still warm grounded plate over smoking tapers or a
candle.
(shown below, left) This is great fun and makes you feel you are
using a centuries old technique, which of course you are,
and not tapping on a keyboard, as I am doing at
the moment. The purpose of this is to give the
ground a blackened appearance so that it is
easier (more visible) to draw on and so
needle the plate. Oh, and don't
forget to turn off your smoke alarm: Rembrandt and
Stothard didn't
have one!
 Then the drawing
is transferred to the plate by the following
process: you first make a tracing of, for
example, your pencil drawing of an effigy. This
need only be an outline tracing as only the
general proportions need to be copied. You then
turn the tracing paper over and lay it on the
grounded plate with a sheet of
trace down
paper between them (white or yellow, is
best), remembering to place it the correct way
up. You then draw with a pencil over the lines
you made on the tracing paper (but on the other
side!). Trace down paper resembles old fashioned
carbon paper in allowing images or text to be
copied onto the
paper, in this case the grounded plate, below so you will find there is an
outline, white or yellow, of the reversed drawing on
the ground over the copper. This reversed
drawing will
print the correct way in
due course.
Now we have a problem: the reversed drawing on the
ground is mainly in outline but you need to fill
in the detail and shading from your non-reversed
drawing. So now you can cheat and return to the
21st century but only for a while: scan your
drawing into the computer, reverse it and then
print the reversed image. Computers, scanners,
and printers do have their use, after all, but
if you are tired of things not working and
screen messages you cannot understand, work
through a mirror as did the etchers of old!
Now we are ready to
needle the plate:
scratching though the ground to expose the
underlying copper, being guided by the lines
made by the trace down paper and the reversed
image you somehow prepared. Try to just go
through the ground and not cut into the soft
copper, or errors will be more difficult to
correct. Here you draw the image outline and
detail with all the shading by a variety of
cross hatching; you cannot at this stage alter
the depth of the line (this will come later) but
you
can make it wide or narrow. An etching
needle is shown below right, but there are other
designs available.
 When ready
 the plate is immersed in the
etchant - usually nitric acid or ferric chloride - for a measured length of time - several minutes
- and then removed. It is then washed and
examined. If you want the lines deeper to give a
stronger line on the forthcoming print the other lines
are
stopped out by painting a liquid varnish
over these lines. The plate is then returned to the
etchant bath and again left for several minutes but this
time the etchant will only bite into the lines which
have not been stopped out. This process may be repeated
several times, etching deeper and deeper lines. This
process requires a good deal of experience to
develop the necessary skill.
Initially the copper plate is
inked: the aim is to cover all of the plate
with ink and especially to force the ink into all of the
etched lines on the plate. Etching ink is very thick and
this work
is carried out with the copper plate placed on a heated
bed. Black ink is shown here but other colours are
available. You can also produce coloured prints with
different coloured inks

but this technique is beyond the scope of
this short article and certainly well beyond my skill!
This is very messy work!
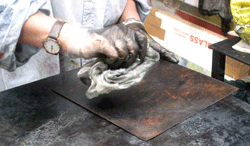
Next you wipe the ink off
again! Well, not all of it just that which is on the
surface of the plate and not in the etched lines. This
is a difficult procedure as if any ink is left
on the surface you will end up with a dirty
looking background (that is, if you
want
it white, as in the etching of effigies)
when you come to produce the first print: and
then you will have to wipe all of the ink off
the plate and start all over again. There are
various techniques for removing all the surplus
ink from the plate, one of which is to wipe it
with the side of your hand, rather like brushing
crumbs off the table for someone else to Hoover
up!
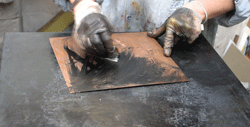 |
 |
| Inking the Plate |
Wiping the Plate |
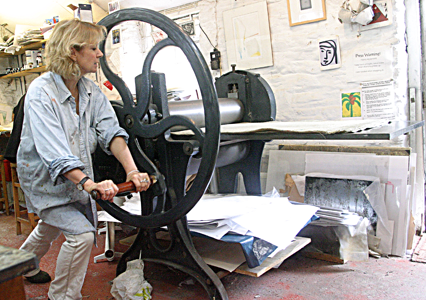
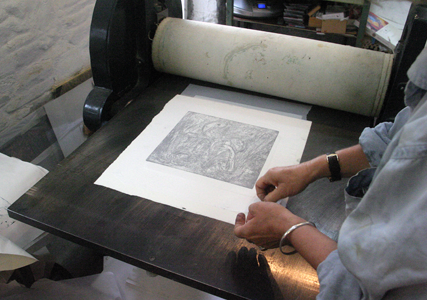
Now you are ready to print the plate:
the copper plate is laid on the bed of the etching
press, which is a special rotary press rather like an old
fashioned mangle, protecting the bed and blankets with clean paper to
avoid any ink marks. This is then covered by the dampened
printing paper, then by a protective paper layer
and a series of thick blankets to even the
pressure from the rollers. You turn the wheel
and the bed with the plate and the paper passes
between two rollers. This can be quite hard
work but the large and very heavy press in operation in the photograph is
geared to make the work easier.
Etching
paper is quite thick and needs soaking in water
for a period before printing can be done.
The plate, paper
and protective layers on the bed of the
press thus travel to the other side of the
rollers and now
is the moment of truth. In the penultimate
photograph below our etcher has thrown back the
blankets, which passed through the rollers with
everything else and is just about lift the
protective layer from the paper underneath. You
can see the image showing through the damp
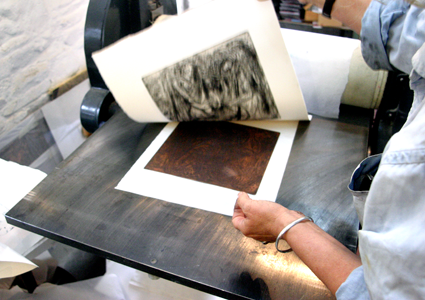
paper. In the final photograph, she lifts the
damp paper away from the copper plate and
there is the image. Success! Note that the image
covers the whole plate so this does not need to
be wiped completely clear of ink as when trying to
achieve a white background such as in etchings of
effigies.
If you are not happy with the result, or if
you want another print...or another, you clear
off all the remaining ink from the plate and start again.
 |
 |
 |
 |
| An Etching Press |
Turning the Wheel
The Work Appears at the Other End |
Lifting the
Protective Paper Which Keeps the
Blankets Clean
You Can See the Back of the Work Thru
This Paper |
Lifting the paper
back and showing the printed image.
The copper plate is below |
If you think about it - you are printing from a metal
plate with ink
in fine lines, not a
raised surface and you are using damp paper: it
shouldn't really work or at least not so as to
produce such fine effects: but it does!
Other Methods
.jpg) There are other ways
There are other ways
of producing plates for intaglio
printing which you are much less likely to come
across and these may be found on the internet in
articles about intaglio printing
,
if you are interested.
I will
mention just one other
method
here, not because I have or have
.jpg)
ever seen original prints produced by this
method, but
because it is a
technique that I have
used
myself on two or three occasions; this is called
aquatint. This
method,
although related to etching, produces
prints which resemble pencil drawings rather
than those produced by etching, which
resemble
pen and ink drawings. It is
difficult to see at this magnification but
compare the image on the left, which was
produced by aquatint, with that on the right,
which was produced by etching. On the left the
tones are solid blocks of shading while on the
right the difference in tone is produced mainly
by cross hatching but also by different
depths of the incised line. This latter process,
produced by using different times in the etching
bath, is actually similarly used in aquatint
although for whole blocks rather than individual lines.
Aquatint can be combined with etching to produce
a line and wash effect: this was used on the
print on the left.
The method of aquatint is, in outline, thus: again you
begin with a clean, grease free copper plate but
this time instead of covering the plate with a
melted, solid ground, it is
covered with powdered
rosin, a solid
form of resin obtained from pine and other
plants; rosin is also used by violinists and
ballet dancers. The aim is
to spread this rosin powder evenly and
completely
over the copper plate. This is difficult to do
well but there are
aquatint boxes to
carry out this process so as to achieve the
desired result; these can be operated by turning
a handle manually so spreading the powder but
there are also mechanically driven ones. These
boxes are expensive to buy: my limited aquatint
work was carried out in a professional studio.
It is possible to spread the rosin powder by a simpler and
considerably cheaper method. The rosin powder is
placed in a silk bag and simply shaken over the
plate; I have never used this process but it
rather sounds like one of those procedures which
is considerably easier said than done. It does
have one advantage in skilled hands: with the
box the rosin is evenly spread but with a silk
bag, it is possibly to vary to amount of rosin
over different areas of the plate. This may
produce interesting (and possibly
unpredictable) effects but my interest is to
simply produce a record rather than any
artistic effect.
This spreading of rosin powder
will simply dust the plate
but the rosin will not adher to it, so
the plate has to be taken (with great care:
eject the cat, turn off the fan, and close all doors and windows!)
to the heated bed which is used for melting the ground in
etching
.
The plate is then warmed until the
white rosin dust begins to melt and turns
yellow; it is then removed before the rosin
completely liquifies and spreads over the whole
plate. Th
is result will
produce nothing! What you are trying to achieve
are dots of rosin spread evenly over and fixed
to the plate.
The desired
apperance are tiny islands of rosin
grains with bare metal between them
.
If
you now etch the plate in
the acid bath the result will be tiny tiny
raised islands of unetched metal, which have
been protected by the rosin, surrounded by a sea of etched and
so very slighly lower bare metal.
If you now ink
the plate as before, the ink will
remain
in the 'sea' while the 'islands' with
be bare uninked metal
,
and
the printed result a uniform gray area
depending on how long you have left the plate in
the etching bath. Actually it will not really be
uniform at all but rather like a
photograph in reverse: the 'islands' all white
(the paper) and the 'sea', which holds the ink
like the etched or engraved line, a shade of gray.
But like a photograph, unless a very grainy one,
it will look a flat gray. Not very exciting but
now if you use stop out varnish as in the
etching process, the stopped out areas will
appear white and the other areas, depending on
how long they are in contact with the etchant,
will turn out to be increasingly darker shades of
gray. The aquatint on the left was begun with a
line etching for the outlines and the aquatint
used later for the shading.
Note that
several of the etchings you may find in
the works of Stothard and T & G Hollis appear
coloured; although coloured etchings can be
produced by a technique using different coloured
inks, these are not the method used in those works.
Rather they are hand coloured etchings, each
print being hand coloured after they were
printed. Actual coloured etching is beyond the
scope of this article and quite beyond me as
well.
| The
Artists |
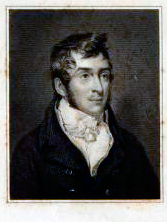 Charles Alfred Stothard (1786-1821)
was the son of the painter
Thomas Stothard RA
by his wife, Rebecca Watkins; incidentally Thomas was
the son of a publican and was born in the Black Horse
Inn, Long Acre,
Charles Alfred Stothard (1786-1821)
was the son of the painter
Thomas Stothard RA
by his wife, Rebecca Watkins; incidentally Thomas was
the son of a publican and was born in the Black Horse
Inn, Long Acre,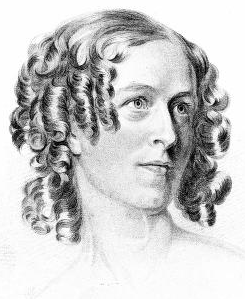 London.
In 1807 C. A. Stothard was admitted as a student of the
Royal Academy and in 1811 exhibited his first historical
painting. In the same year he published the first part
of what was to be the twelve part work, The
Monumental Effigies of Great Britain. Charles himself
executed the pencil drawings of all the monuments in the
various churches and subsequently reproduced the majority
of them as etchings. The
artwork was accompanied by information about the
monuments themselves and those they represented. Charles Stothard died before the work was completed
so the etchings in the last two parts were executed from
his drawings by other artists. All the parts were bound
in a hefty book with an introduction, including a life
of the artist by
Alfred John Kempe, his brother in law, in 1832. London.
In 1807 C. A. Stothard was admitted as a student of the
Royal Academy and in 1811 exhibited his first historical
painting. In the same year he published the first part
of what was to be the twelve part work, The
Monumental Effigies of Great Britain. Charles himself
executed the pencil drawings of all the monuments in the
various churches and subsequently reproduced the majority
of them as etchings. The
artwork was accompanied by information about the
monuments themselves and those they represented. Charles Stothard died before the work was completed
so the etchings in the last two parts were executed from
his drawings by other artists. All the parts were bound
in a hefty book with an introduction, including a life
of the artist by
Alfred John Kempe, his brother in law, in 1832.
In 1809 Charles Stothard made the acquaintance
of Alfred John Kemp, a fellow antiquarian, who would later
assist with the text of
Monumental Effigies. Alfred Kemp was the son of a
bullion porter at the mint and had a sister Anna Eliza
to whom Charles became devoted.
In 1815 the artist was employed by
Daniel Lysons to produce drawings for the latter's
topographical work, Magna Britannia, and he
journeyed throughout England to carry out this work. While
he was away Mr. Lysons procured Charles the post of
historical draughtsman to the Society of Antiquaries in
London. In 1816 he was employed by that society to make
drawings of the of the Bayeux Tapestry. At this time the
tapestry (actually not a tapestry at all but rather an
embroidery) was stored in a roll on a drum which was
unwound for visitors; today the display is more
convenient for visitors!
The artist made three journeys to post-revolutionary
France, these being in 1816, 1817, and 1818, where he
sought the effigies of the early Plantagenets. It had
been assumed that these effigies had been destroyed
during the French Revolution, when there had been a wave
of destruction of monasteries and churches, rather
similar to that during the
Dissolution of the Monasteries in England in the 16th
century. The burial place of four of the early
Plantagenets was at Fontevraud Abbey (Maine-et-Loire) and
here Charles discovered the effigies of Henry II; his
wife, Eleanor of Aquitaine; their son, Richard the Lion
Heart; and their daughter-in- law; Isabelle of Angoulême,
the wife of their son, King John. The Abbey had been
turned into a prison by Napoleon but the artist
discovered the effigies preserved in a 'cellar' there. I
am uncertain what is meant by 'cellar': this may refer
to the Romanesque Kitchen (similar to the one at
Glastonbury, England) or to one of the underground
passages with which the Abbey abounds. He also travelled
to L'Epau Abbey near Le Mans (Sarthe) where Berengaria
of Navarre, wife of Richard the Lion Heart, had been
buried. This abbey had been converted into farm
buildings but Charles Stothard discovered Berengaria's
effigy there too; this must have been during the 1816
visit, as he records that he returned the following year
to make a drawing. At Le Mans itself he made a
drawing of the enameled plaque that had originally hung
over the tomb of Geoffrey Plantagenet in Le Mans
Cathedral; I do not know where he found this monument
but it is now preserved in the new museum in that city, Le Carré Plantagenêt.
He also visited Caen
(Normandy) to record the tombstone of Queen Matilda,
wife of William the Conqueror, which presumably was, and
still is, preserved in the Church of the Trinity there. All
of these drawings were converted into etchings by Charles
Stothard himself and may be seen The Monumental
Effigies of Great Britain.
In 1816 the artist also visited Paris
where he made a drawing of the effigy of Bernard du
Guesculin, then at the Museé des Monuments.
This effigy was originally at St Denis
and has now been restored to that cathedral. The story
of the destruction and recovery of the monuments is
described in the Paris page of this
website. In 1817 he visited
Chartres Cathedral (Eure-et-Loire) and recorded
two of the standing figures on the south door, and on
the same trip he visited Compiègne (Oise) and
recorded a medieval effigy there; I have not been able
to locate this effigy to date.
Many French monuments had been
destroyed but many
had not. Perhaps the French were more careful with
their cultural heritage than were the
English, and especially the Scots, but, more likely,
people had become more sensitive to their heritage during
the three hundred years between these two waves, as well
as valuing things for their historical and artistic worth
rather than destroying them for what they assumed they
represented. So we can thank Charles Stothard for
discovering these effigies and to
at least have contributed to their preservation, and the
fact we may see them today. It is
to be regretted that his own monument at Bere Ferrers has not received
the same care, the inscription being now virtually obliterated.
In 1818 Charles
married Anna Eliza Kemp
and his new wife accompanied him on a final (1818) visit
to France; his wife wrote a detailed account of their
journey, and so began her career as a
writer. They first journeyed through Normandy and visited
the church of Our Lady and St Laurent at Eu
(Seine-Maritime), where they descended down a ladder
into the unlit crypt through a hole in the pavement of
the nave. The monuments were originally in the body of
the church but only the effigies survived destruction,
being thrown into the crypt. The artist recorded
three of these monuments there, although there are now
several more, all restored and which may be seen in the crypt, now lit and accessible via a staircase.
The Stothards visited Rouen, Paris and then
Bayeux (Calvados) where the artist completed the
drawings he had begun earlier, of the famous tapestry,
aproject that he had taken him three years.
They left Normandy and travelled into Brittany,
seeking two effigies of the Dukes of Brittany at
Ploermel (Morbihan), which had been moved to an
Ursulines Convent. Charles executed three drawings of
these two effigies; they were later moved in 1821 to St Armel's
Church, where there are now two further effigies. Next they visited Josselin (Morbihan)
where they found the effigies of Oliver de Clisson and
his wife Marguerite de Rohan, which were badly damaged
with several fragments in a garden. The artist executed
a drawing of these effigies, which are still in
the Basilique Notre-Dame-de-Roncier in the town.
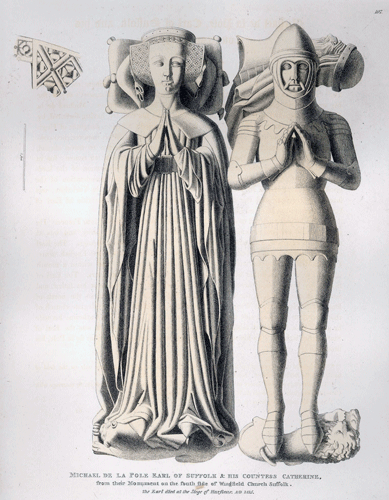
The next place visited was Vannes where, in the ruins of
the Church of the Cordeliers, the couple discovered two
broken effigies, one being of Arthur Duke of Brittany
-1 (c. 1330) and Charles duly recorded them.
The effigy of Arthur is said to have been repaired and
on display but to date I have been unable to locate it.
He did not only draw monumental
effigies but other sculpture and views of the
environment as has been indicated above. At some point
the couple must have visited St Maurice's Catherdral at
Angers (Maine-et-Loire) where Charles recorded the
figures around the doorway.
These drawings of French effigies were intended to
be included in a further book, a companion volume to
The Monumental Effigies of
Great Britain,
although some of the etchings in that latter book
did include effigies he had recorded in France: these
were relevant, being of members of the Norman and Angevin houses of England's ruling families. This
unfortunately was never to be, although Anna Eliza did
keep his drawings in an album or albums. These were
dispersed at some later time, possibly following her death. Two
albums of drawings of monumental effigies came up for
auction several years ago and were published in the
Journal of the Church Monuments Society. (Vol.XIII
1998). I do not have access to the original drawings but
I will add my own pencil drawings of them to this site in
due course.
In 1819 the drawings of the Tapestry were completed and
presented to the Society of Antiquaries together with a
paper on the dating of this magnificent work. Later that
year the drawings were published and Charles Stothard
elected a Fellow of the Society. In 1820 the artist
worked on the ninth part of The Monumental
Effigies and in the autumn of that year the couple
visited the Netherlands.
In 1821 Daniel Lysons commissioned Charles Stothard to
visit Devon to make drawings for the Devon volume of
Magna Britannia, so he left London on May 16th, rather
reluctantly without his wife who was now in the later
stages of pregnancy. He worked at Linton, Coombe Martin
and Ilfracombe, travelling mostly by foot; he reached
Atherington - where he made drawings of the excellent
double monument on May 24th. He spent the night
of the 25th - a Friday - at Hatherleigh, where his
journal ends.
He arrived at Bere Ferrers on the Sunday
afternoon, so had spend all of Saturday travelling, a distance of some thirty miles.
He met the Rector
-2, Mr. Henry Hobart, in the churchyard of
the parish church, St Andrews. I
know the route well and it is quite possible that
Charles
Stothard, who was young and clearly very fit, could have
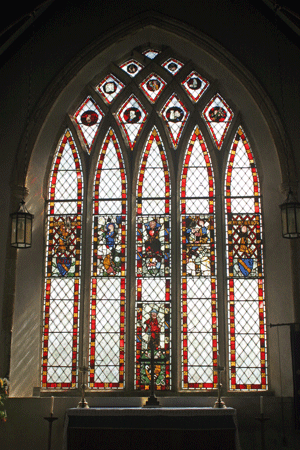
walked all the way. The Rector give permission to the
artist for his project which was to draw the stained glass
window at the east of the chancel, even borrowing a
ladder from a local gardener and arranging for it to be
set up in St Andrew's for Charles to begin work
on Monday morning; furthermore he invited the artist to
stay at the rectory for as long as he needed to complete his
work.
Charles Stothard began his work as planned at ten
o'clock the following morning. The Rector arranged
for his curate, a Mr. Servante, to accompany the artist
to the church and remain with the artist a short time to
make sure he had everything he required. At two o'clock
in the afternoon Mr. Servante visited the church to see
how the work was progressing: the ladder at this time
was in its original position, to the north of the altar
but the artist indicated he would soon be moving the
ladder to the opposite side. The Rector was visited by
the local doctor and he was asked by Mr Hobart to call
into the church to see how the work was progressing and to
remind the artist that dinner at the rectory was taken at
five in the afternoon.
However, the artist was destined never to return to the
rectory as the doctor found him lying on the floor,
unconscious but still alive. It was discovered that the
ladder had sustained a broken rung and that the artist
had fallen and struck his head on the slab with the
effigies of a knight and lady which was nearby. Within three
minutes of the doctor's arrival Charles Stothard died.
Mr. Hobart attempted to trace Charles Stothard's family,
and found an envelope in the artist's pocket on
which was written the name and address of a London
publisher, to whom he wrote a letter explaining what had
happened. Bere Ferrers is a remote village by road and
must have been even more so 200 years ago, so Mr. Hobart
explained in this letter to initially go to Plymouth and
take a boat up the River Tavy to 'Beer Church Town', as
it was delightfully known then. The publisher replied
two days later to say the artist's father, Thomas Stothard, had left for
Plymouth that morning.
The inquest found no suspicious
circumstances and it must be added that the gardener, a
heavily built man, from whom the ladder was borrowed,
stated that he had been using it regularly. The artist
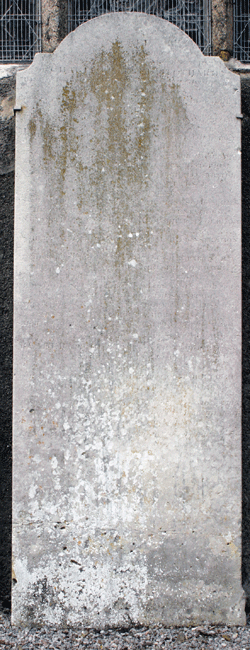
was buried on the 4th June that year: his grave stone
and further information is shown below.
 |
 |
 |
 |
 |
.png) |
| Above
left: St
Andrew's in Bere Ferrers
where Charles Stothard was accidentally killed.
Above right: The brass plaque marking
the place where he died. Near right:
The stained glass window he was drawing when he
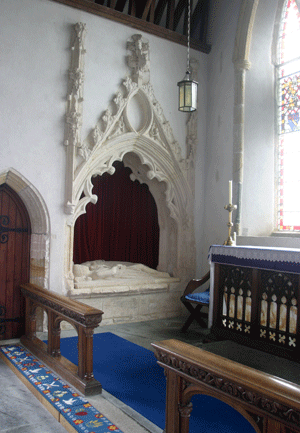
fell. Center right: The chancel at Bere
Ferrers. The plaque can just be made out in
front of the monument. Centre left:
Charles Sothard's grave stone in the church yard
below the window he was drawing. The stone is
very eroded and now virtually illegible, from the wind, rain and spray from
the River Tavy. The stone is now resting on the
ground and clamped to the church wall. There are
no official burial records but various notes
indicate this this is the site of his burial. I
presume a path has been excavated around the
church. Far left: Etching of the
monument in the chancel. |
Anna Eliza Stothard, Charles's widow, gave birth to a
daughter, Blanche, on 29th June 1821, just a
month after her husband's
death. Sadly the little girl died at six months of
age on the 2nd of February the following year. Anna
Eliza and her brother, Alfred Kempe, to whom I have
alluded above, completed the work on Monumental
Effigies, now using other artists to prepare and
print the plates from the drawings that Charles had
executed. These artists included Charles's brother,
Robert Stothard, and Edward Blore, the architect, who
has been mentioned on these pages. The etchings of the
double monument at Atherington, which Charles Stothard
had drawn on his Bere Ferrers trip, was etched by one C.
J. Smith.
I find it curious to relate that Anna Eliza
Stothard married Rev. Edward Bray, the Vicar of
Tavistock, the year following her husband's death. We
cannot know the exact circumstances of this, we never
shall, but she mentions in a letter, very peculiar
events. During this second marriage she continued
and developed her writing career, which included
topographical works, biographies, novels and romances.
She returned to London after her second husband's death
and died at the grand age of 93.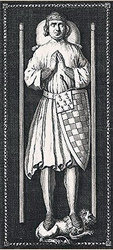
-1 I assume that this
effigy is of Arthur II, Duke of Brittany, who died in
1312. The is confirmed by comparing the drawing, by an
unknown artist, on the right to Charles Stothard's
drawing of Duke Arthur; although the work shown is
nowhere near as finely executed, they are similar enough
to be considered to represent the same man. As mentioned, although this
effigy, seems to have been badly damaged when the
Stothards visited, it is said to have been restored
,although I have been unable to locate it. Unfortunately
I do not have access to the original Stothard drawings.
-2 The rector of Bere Ferrers is given the curious title of archpriest.
In earliest times the archpriest was the head of the priests
of a diocese and an archdeacon was the head of the
deacons; the meanings of these terms and the function of
their offices has changed over the years with an archdeacon
now having jurisdiction over an archdeaconary, a
subdivision of a diocese. An
archpriest is now just a curious - and rare - title,
although there are associated privilages. An
archpriest had a supervisory roll - but not jurisdiction - over
a number of priests, with the archpriest being the
priest of the principle parish, in other words with a
similar funtion to the modern rural or area
dean. The number of archpriests diminished over the
years, especially following the Reformation, until now
there appear to be only two, at Bere Ferrers and at
Haccombe, also in Devon. The title of archpriest was
confirmed as late as 1913. In theory the archpriest is
not under the authority of the bishop but only
acknowleges the Archbishop of Canterbury although, in
actual practice, the usual procedure of the church
heiarchy is followed. The title archpriest does not
follow the incumbent should he move to another parish,
but remains with the parish.
I was
given a course in etching by my wife as a birthday
present, at a studio near Gunnislake in Devon which, by a
curious coincidence, was about six
miles from Bere Ferrers.
George Hollis (1793-1842) & Thomas Hollis
(1818-43) Father and son who began work on what
was to be a continuation of Charles
Stothard's
Monumental Effigies of Great Britain in 1839,
following the premature death of the latter. For
example, Charles Stothard never executed an etching of
Richard II and Anne of Bohemia, in Westminster Abbey,
but these are included in the Hollis collection; whether
Charles Stothard had intended to do so, or perhaps he
made the preliminary drawings only, I do not know. George is
described as an engraver and his son, Thomas, as a
painter and draughtsman. Initially Thomas executed the
drawings while his father made the etching plates.
George died in 1842 so then Thomas continued the work
alone, executing the original drawings as well as making
the plates. Unfotunately Thomas died of
tuberculosis the
following year at the early age of twenty-five so
the work was never completed. I am afraid I have no
images or or further information about this father and
son.
Their work was published in a similar form to that of
Charles Stothard but there is no accompanying text.
|
 Pencil drawing is an excellent method for
producing good, accurate renderings of church monuments,
especially
while in
the church. This is what the etchers, such as Charles
Stothard and Thomas Hollis, used to do all those years
ago in order to produce preliminary drawings for their finished work. I
use a series of pencils from hard to soft with which it
is possible to produce clear lines and good shading.
Highlights can be added by using a plastic eraser to
lighten the shaded area. But pencil drawings, no matter
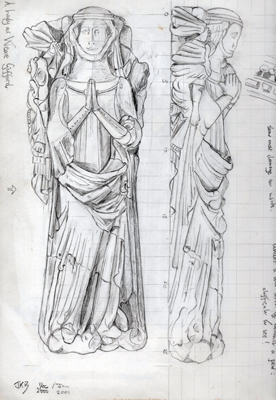
how fine they may look, do not reproduce particularly well on the
internet. Compare the drawing on the left of the lady at
Wear Gifford, on the banks of the River Torridge in Devon,
which I drew in the church around twenty years ago with
the pen and ink drawing on the right, which I produced
at home more than forty years ago. However having seen
Charles Stothard's original pen drawings, I think I
shall have to sharpen my rechnique!
Pencil drawing is an excellent method for
producing good, accurate renderings of church monuments,
especially
while in
the church. This is what the etchers, such as Charles
Stothard and Thomas Hollis, used to do all those years
ago in order to produce preliminary drawings for their finished work. I
use a series of pencils from hard to soft with which it
is possible to produce clear lines and good shading.
Highlights can be added by using a plastic eraser to
lighten the shaded area. But pencil drawings, no matter
how fine they may look, do not reproduce particularly well on the
internet. Compare the drawing on the left of the lady at
Wear Gifford, on the banks of the River Torridge in Devon,
which I drew in the church around twenty years ago with
the pen and ink drawing on the right, which I produced
at home more than forty years ago. However having seen
Charles Stothard's original pen drawings, I think I
shall have to sharpen my rechnique!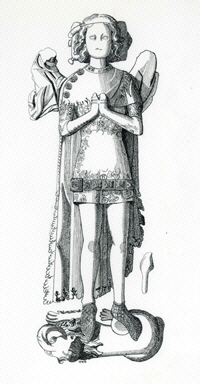 I
executed this drawing of Prince William of Hatfield,
young son of King Edward III, by copying an etching by
Charles Stothard. The lady in Wear Gifford is under a
very low arch and behind the choir stalls and so is
difficult to draw and not easy to photograph well from a
good angle. William of Hatfield is in an
even more difficult position in York Minster so how Mr.
Stothard produced his original drawing is quite
amazing.
I
executed this drawing of Prince William of Hatfield,
young son of King Edward III, by copying an etching by
Charles Stothard. The lady in Wear Gifford is under a
very low arch and behind the choir stalls and so is
difficult to draw and not easy to photograph well from a
good angle. William of Hatfield is in an
even more difficult position in York Minster so how Mr.
Stothard produced his original drawing is quite
amazing. 
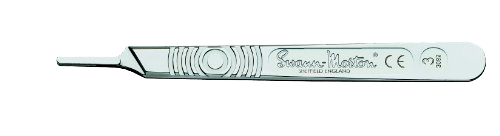
 could
correct a mistake, remove a blot and, especially
useful, gently scratch the line with a scalpel to make it
less black which makes the drawing, as may be seen,
resemble an etching. If you removed an error there would
still be a usable
drawing surface below. The surface itself takes a fine
line without it bleeding: some papers are almost like drawing
on blotting paper in this respect. I used to scratch out with a number 15
Swann-Morton blade, then use an ink eraser or stick and
finally polish the paper with a pencil eraser.
could
correct a mistake, remove a blot and, especially
useful, gently scratch the line with a scalpel to make it
less black which makes the drawing, as may be seen,
resemble an etching. If you removed an error there would
still be a usable
drawing surface below. The surface itself takes a fine
line without it bleeding: some papers are almost like drawing
on blotting paper in this respect. I used to scratch out with a number 15
Swann-Morton blade, then use an ink eraser or stick and
finally polish the paper with a pencil eraser.