 |
Taking Photographs |
 |
| 1. Shutter speed | 2. Aperture of the lens | 3. Film speed - or on a digital camera - effective film speed |
Shutter speed tells you how long the shutter (the thing that opens to let light into the camera) is open; if you think about it, it should really be called shutter time. On the more professional cameras you can set this at anything from 1/8000 second to 30 seconds or more and you can even extend this to minutes or hours if you control the actual time the shutter is open manually, rather than letting the camera do so. The longer the time the shutter is open (confusingly a called a slow shutter speed) the more light enters the camera. Ideal for church interiors? Yes, but if you hand hold the camera for anything longer than 1/50 second, or possibly even less, you will get 'camera shake', unless you have a very steady hand. So the camera will need supporting on a fixed surface - or better still - a tripod. Both of these methods can be limiting. You can set the shutter speed on the camera yourself but cameras like to be awkward: 30 on the camera really means 1/30 of a second, 500 means 1/500 of a second...etc. Incidentally the setting B seen on some cameras means you can open the shutter as long as you like; press it and it opens, release it and it closes. There used to be a T on some older cameras, which you pressed once to open and then once again to close the shutter; you could then go for a cup of tea while the camera - not you - kept the shutter open. A tripod is definitely needed with these slow speeds but so is one of those remote releases to avoid jerking the camera when you press the shutter button; this latter cannot be fitted to the camera shown. Of course you can let some cameras choose everything automatically but there will be times when the camera does this less than optimally, rather like a car's automatic gear box.
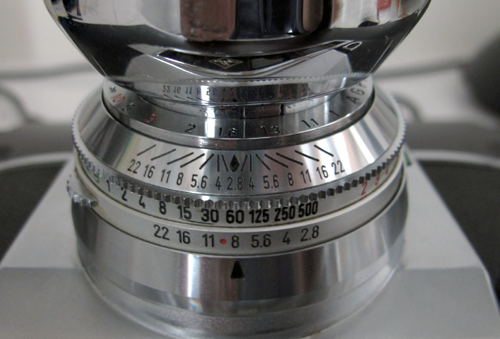
Left: An old Agfa camera which must be over half a century old and which recently I bought for £10! The rings round the lens from the bottom up are:- 1. This controls the aperture and is set on f8 here. 2. This controls the shutter speed, which is set on 1/60 of a second. 3. This seems to repeat the aperture number and works with the focusing ring 4. Focusing ring. Estimate how far away in feet (yes, feet remember them?) your subject is from the camera and turn this ring until the diamond shaped pointer, which is on the ring below, points, to that estimate. This is 1.8 in the photograph. Your subject should now be in focus; you cannot look through the viewfinder to do this but that will come later. If you follow the lines up from the f numbers they will show you how much of the whole photograph in front and behind the subject will also be in focus. Almost nothing at f2.8 but better as the aperture becomes small as we go towards toward f22. The depth of field is small at close focusing range but improves dramatically with distance.
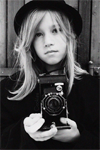
Notice how the background is blurred in the photograph as I used a large aperture and focused close up.
 blurred
of course,
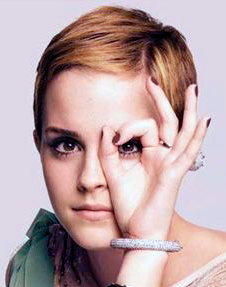
out of focus. Now make a tiny aperture with
your index finger and thumb and try again: suddenly you
can read it. A good technique if you forget your specs
although you might look rather eccentric. Perhaps
some kind passer by
might take pity and offer to buy you some
blurred
of course,
out of focus. Now make a tiny aperture with
your index finger and thumb and try again: suddenly you
can read it. A good technique if you forget your specs
although you might look rather eccentric. Perhaps
some kind passer by
might take pity and offer to buy you somespectacles!
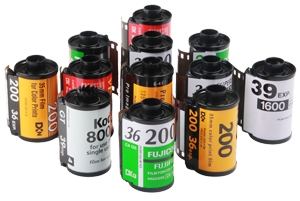 Image on right: Yes, like that but smaller...much smaller.
Film speed. This tells you how 'fast' or 'slow' this film is, meaning that a fast film will need less light to expose it correctly than a slow film. Again the term speed is used loosely: light sensitivity would be more accurate. So with a fast film you will be able to set a shorter exposure on your camera than with a slow film. Film speed is given by an ASA number: most films are 80, 200, or 400 ASA, not at all a big range.; the image shows films of 800 and even 1600, but I have never seen one. Yes, the bigger the number the faster the film: rationality at last! You can also 'push' films to a higher rating if you're a crack hand in the dark room. Will this help? By now you will expect there to be a trade off: the bigger the ASA number, the grainier the photograph will look. It was only the most sophisticated cameras which allowed you to remove one film and then insert another and then swap it for the original again without winding the film back; I have never seen one.
Image on left: 35 mm film cassettes with speeds from 200 to what was then a whopping 1600 ASA.
Help is on its way. On digital cameras it is possible to adjust the 'speed' or sensitivity of the sensor, pushing it up to 25,000 and beyond. A trade off? As you push the speed up the result becomes 'noisier' but the effect is mostly quite acceptable and is getting better. I regularly push up the speed. For small images this works very well indeed.
| Focusing | & | Colour |
Note that the word lens means two slightly different things: a single individual lens as in spectacles or what Sherlock Holmes often employs, or, a system of lenses as occurs in a camera, the eye, a microscope or a telescope. The individual lens in a system of lenses is then called an element.
The camera, like the eye, must focus an image of what is being seen onto the film or sensor, in the case of the camera, or the retina, in the case of the eye; otherwise a blurred image would be the result. In each case the image in actually upside down but your brain turns it 180º, so it becomes the 'right' way up, without your realising, as does the electronic gadgetry of the camera. But there is a difference: the retina is curved, the eye being round, so we see the world as curved, as well as upside down, but the clever brain, as ever, straightens it out for us. Both camera and eye focus the image by a lens - or, in reality, by a series of lenses - but the actual mechanisms - although not the result - are quite different: the camera focuses by the several elements of the lens system being moved with respect to each other while the eye does so by changing the curvature of the lens, meaning the anatomical lens rather than the actual system of lenses, which consists of the cornea, lens and the fluids inbetween.
To focus a camera a ring on the lens barrel is rotated so to move the elements of the lens nearer or further apart. You can do this yourself - manual focus - or the camera can do it automatically - autofocus. On the older camera it was manual focus only, although sometimes aided by a rangefinder, while on the more sophisticated modern camera you can choose between them. One reason for having this choice is the rare occasions when the camera will not autofocus, such as in very dim light. To use autofocus you set 'autofocus' on the lens barrel, point the lens at the subject and depress the shutter button about half way so that it does not open the shutter and actually take the photograph. You will then see a ring of the lens barrel rotate and the barrel itself lengthen or shorten, and, if you are looking through the viewfinder (usually on a SLR camera) you will see the subject move into focus. Whatever is at the centre of the lens should now be in sharp focus, as well as everything in the vertical plane in which it is situated. A certain area in front of and behind this plane will also be in sharp focus, depending on the aperture of the lens and its focal length.
But what if you do not want the subject you have just focused on to be in the centre of the frame of the photograph? This is easily corrected: focus the camera on this subject and then, keeping the shutter button pressed half way down, move the camera so the whole photograph is framed as you want it and then fully depress the shutter to take the picture.
Next time buy your daughter a black dress, which reflects very little light. Or use a black and white film or adjust the sensor. But even black and white films can fool you when it comes to reproducing colour, but this is beyond the scope of this article.
But what colour is the dress really. Do not listen to those philosophical ramblings: because it reflects all the light falling on it, and absorbs and transmits none, it is white.
| Composition And All That |
And if you are in charge of a church in some way please do not put flowers in vases on top of monuments: the water will progressively damage the stone.
Moving the Monument!? I did once move a monuments so it was in the ideal position to photograph. However this is usually not possible and certainly not recommended: it was made of wood, however, and I was helped by the Vicar.
 In the first case if you cannot back away from the
monument or do not have a wide angle
lens or a zoom lens that does not give a wide enough angle,
then take a photograph of the monument at a sideways angle so
effectively increasing your distance from it.
In the first case if you cannot back away from the
monument or do not have a wide angle
lens or a zoom lens that does not give a wide enough angle,
then take a photograph of the monument at a sideways angle so
effectively increasing your distance from it. Wide angle lenses are excellent - although expensive - but without care they can distort the objects you are photographing. Let us look at an extreme case of this although this concerns wide angle lenses rather than wall monuments. Suppose you are taking a photograph of a knight who lies under a very low arch and a lens with a wide enough angle to photograph him from head to toe by holding the camera at the highest point - the middle - of the arch. The result of the photograph will be that the knight's body will be fine but you will have photographed underneath his chin and the top of his feet: this is what the camera actually sees. And what you will see if you can get you head under the arch and keep your head and eyes absolutely still - and do not let your brain interfere either. It improves, of course, as you move further away but then you will hit the top of the arch: so take the photograph outside the arch. You will not have a 'Stothard' view, of course, but a quite acceptable one. So as the photograph on left shows: don't photograph your pretty daughter close up with a wide angle lens, except for fun, of course.
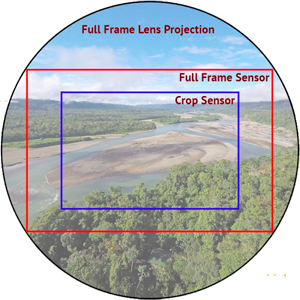 camera. Films do too but a 35mm camera will
only take a 35mm film, by definition. A sensor will
either be full frame or cropped. A full frame
sensor is the same size as a 35mm film but a cropped
sensor is smaller so that with the same lens you will
obtain a smaller area than you would with a full
frame sensor or film.
If you use a 28 mm wide angle lens on a cropped frame
camera the lens will act as a 35mm lens so you will
achieve a narrower angle of view as the blue box rather
then the red one on the image on the right. The solution here is simple: just
move a little further away if you can. But if you hit a
wall or fall over a cliff, you clearly cannot! And of course a
camera with a full frame sensor is much more expensive.
camera. Films do too but a 35mm camera will
only take a 35mm film, by definition. A sensor will
either be full frame or cropped. A full frame
sensor is the same size as a 35mm film but a cropped
sensor is smaller so that with the same lens you will
obtain a smaller area than you would with a full
frame sensor or film.
If you use a 28 mm wide angle lens on a cropped frame
camera the lens will act as a 35mm lens so you will
achieve a narrower angle of view as the blue box rather
then the red one on the image on the right. The solution here is simple: just
move a little further away if you can. But if you hit a
wall or fall over a cliff, you clearly cannot! And of course a
camera with a full frame sensor is much more expensive.The second problem with large wall monuments is when they are situated against a window as well as a wall. Here we have a low light bottom part and a upper part against a bright light. The problem begins with the latitude of the film or sensor. This means are they sensitive to a wide range of light? If you expose for the dark bits will the light bits be correctly exposed or if you expose for the middle bits will either of these other bits be correctly exposed? Of course they won't as you will have guessed! The latitude of films is greater than that of digital sensors - but the experts are working on it. So the photograph you take today (digital) will not be as good (from the latitude point of view) as the one you took in last century (film).
How to solve it. You can wait for a duller day when the window is not so bright. Or you can try taking exposure readings from different parts of the monument and try several variations; nice and easy and much cheaper with a digital camera. Or use flash - take care: this will be dealt with in due course here.
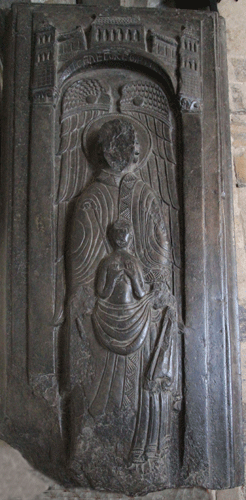 Victorian
brass, both to bishops centuries apart.
Victorian
brass, both to bishops centuries apart.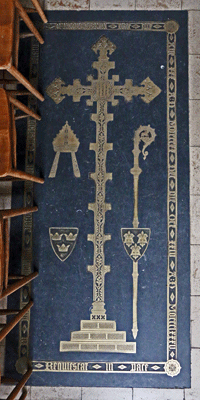
Don't try this! In the 1980's I visited Hornby (the one near Bedale, which too is worth a visit) in North Yorkshire. There are several effigies on the floor in a chapel there; these effigies used to be on tomb chests but these latter are long gone. I could not quite get a bird's eye view of a pair of effigies with my 28 mm lens and film camera, so I climbed on a high window sill and leaned out over the monuments, hanging onto a rather rusty window fitting and holding my camera at arm's length. It is not possible to look through a view finder doing this but in those times I could hold a camera steady at arm's length and parallel to the ground. I still took several shots, being a long way from home. I returned in the 2010's but I did not attempt this antic, mindful of Stothard's untimely end (the fittings were rusty) or (and more likely) no longer being able to climb on window ledges and hang from fittings. Or was it because I now had a digital camera with a pull out screen and an ultra wide 10 mm lens. It is difficult with such a wide lens to hold the camera parallel to the ground as the slightest tilt matters.
Tomb Chests with or without effigies or brasses. As I do not take what might be called arty photographs being interested more in docmentary records several photographs need to be taken of these monuments. There seems to be a 'How To Photograph' book on just about everything from micro-organisms to galaxies but 'How To Photograph Church Monuments' does not exist. There nearest I have ever found is Photographing Historic Buildings for the Record by expert photographer Terry Buchanan and published by the RCHM in the film camera days of 1983 and which I bought recently for £00.01, surely the best value book ever! Pity about the £3.49 postage but it did make the cost a nice round figure! The photographs are all black and white and, it goes without saying, of superb quality. Mr Buchanan uses a versatile large format camera and, where necessary studio lighting but the techniques can be transferred to 35 mm digital cameras with a little thought.
 There are only
three pages on photographing monuments, although they do
appear in part on other pages; however the whole book is
very helpful. For the
There are only
three pages on photographing monuments, although they do
appear in part on other pages; however the whole book is
very helpful. For the se tomb chest
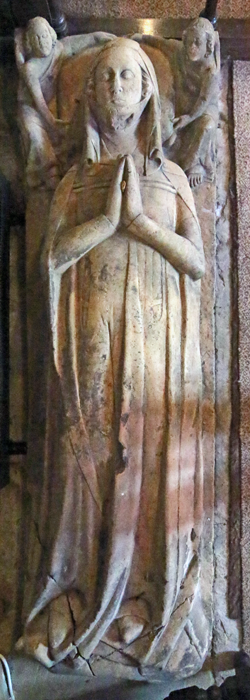
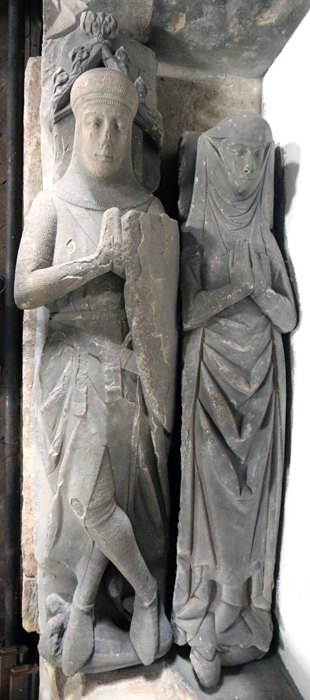
monuments he writes, 'The record of a tomb with reclining
figures should consist of two views, from the side to
show the details of clothing, equipment and decoration
and from above to show the proportion, posture and
relationship of the figures.' The side view is taken
looking down slightly on the monument and the above view taken downwards at an angle but from an elevated
viewpoint, probably using a ladder in some cases. When I
take these photographs I also like to
record close up any interesting feature, such as
armour details, heraldry, beasts and anything else that
catches the eye. How all this may be attempted without a
ladder will be mentioned in the digital section.
se tomb chest
monuments he writes, 'The record of a tomb with reclining
figures should consist of two views, from the side to
show the details of clothing, equipment and decoration
and from above to show the proportion, posture and
relationship of the figures.' The side view is taken
looking down slightly on the monument and the above view taken downwards at an angle but from an elevated
viewpoint, probably using a ladder in some cases. When I
take these photographs I also like to
record close up any interesting feature, such as
armour details, heraldry, beasts and anything else that
catches the eye. How all this may be attempted without a
ladder will be mentioned in the digital section.Underneath the Arches Of course there are going to be all sorts of in between cases but the final one is when the monument in under an arch. If you
 can position your camera at the apex of the arch then
you should be able to get a bird's eye image of the
monument, otherwise one from high but at an angle
looking down at the monument is probably the best view.
I was fortunate at Hornby (the one
mentioned above) and I was able to do both of these
reasonably satisfactorily. Otherwise a
compromise will have to be made by perhaps taking the
high side angle and then perhaps a close up at whatever
angle you can of the face or faces.
can position your camera at the apex of the arch then
you should be able to get a bird's eye image of the
monument, otherwise one from high but at an angle
looking down at the monument is probably the best view.
I was fortunate at Hornby (the one
mentioned above) and I was able to do both of these
reasonably satisfactorily. Otherwise a
compromise will have to be made by perhaps taking the
high side angle and then perhaps a close up at whatever
angle you can of the face or faces.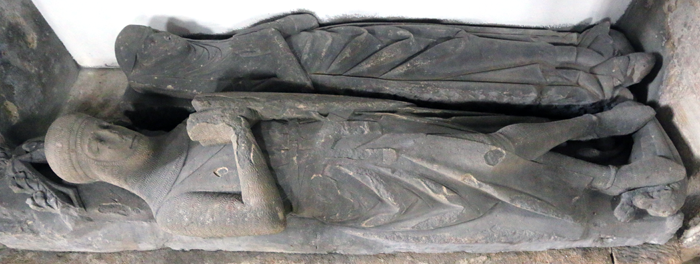
| What to do if Autofocus Fails? |
| Sometimes - in dark
conditions for example - autofocus will not
work. Here is what you do: the first are what
photographers of old would do and the last is a trick
they couldn't! i) Set the lens on manual focus. So now you're like a photographer of old. Estimate the distance between the subject and the camera, that is , the back of the camera. I just can't do this but my wife and daughter can. ii) Look through the viewfinder and turn the focus ring until your subject moves into focus: this will only work if you have a coupled rangefinder (which you may have but didn't actually know) or with a SLR, where you are actually looking though the lens itself. iii) Even better: measure the distance with a tape in inches. (which you have brought along, of course!) iv) Trick! You need an assistant for this. This time return the lens to autofocus and ask your assistant to shine a bright torch (which you have also brought along, of course!) on part of the subject: not the whole as this will be too dim. Now see if the autofocus works by pointing the camera at the illuminated area. Now check what distance reading on the lens the camera has automatically set and note it. Now turn the lens back onto manual focus, set the distance that the camera had previously set and take the photograph. |
| Some Simple Tips but Easily Forgotton Ones |
1) Always at least try to obtain permission to take photographs - and check if the church is unlocked. 2) Check that you have all your gear before setting out. Spare batteries? Batteries fully charged? Don't forget torch and tape measure 3) Take your time; don't rush it. 4) Think what you are trying to achieve and work out how best to do it 5) Try to see what the camera sees. This sounds like one of those trite tips but it is important as cameras/sensors and eyes/brains are not the same. So with regard to this: 6) Compose the picture so it is taken from the most satisfactory angle. You may need more than one. Remove any junk (including yours) from in front of the subject 7) Carry out the adjustments: colour temperature, exposure reading, focusing. Do you need a tripod? 8) Now take the photograph 10) Check it on the screen, enlarging it if necessary. If you are not happy: 12) Retake the photograph but do not scrap the previous one unless you are convinced that this second one is better. |