| Visiting the Church and Obtaining
Permission |
The majority of parish churches in Britain as well as in France are open during the day although
the times of opening and closing do vary; however, visiting
between 11.00 am and 4.00 p.m. should find the great majority open.
There is a local French church which has different opening hours
on different days and even that changes with the months; however
that is the exception rather than the rule for churches. I must
add that in contrast this is not the case for French shops whose
opening times are somewhat arbitrary! Some
churches are kept locked: sometimes there appears to be a good
reason for this, other times there does not. For example, there
are a series of churches along the same country road in Devon
which are part of a team benefice; three are kept open but one
is locked. It seems that the team clergy would like to keep all
churches open but the parochial church council of the church in
question prefers to keep it locked. Incidentally, it is the least
interesting church of the series.
At one time it used to be said that the key was
kept somewhere in the porch, on top of a notice board or behind a
seat for example. This may well have been for cleaners, flower
arrangers and others who had regular business in the church. I have only ever
come this once: I had walked several miles to a small country
church in Devon only to find it locked. I tossed my rather heavy
walking stick onto a seat in the porch in frustration and to my
surprise the key fell to the floor; it mush have been secreted
under the seat. This is not advising you to attack the fixtures
and fittings in the porch with stick. On another occasion I wrote to the
vicar of a church in Hampshire asking for permission to visit
the church; this however turned out a
'redundent' church, as they used to be called at the time, but
the post office very efficiently, as always, delivered my letter to the
church's key holder. This person wrote to me and asked me to
telephone him for an appointment. This I did, indicating the day
I would like to visit and this caretaker rather curiously
gave me his address and said that a key would be available under
a large stone on the door step at 10.00 o'clock. I arrived
early, as I always do, looked under the large stone but
found
no key. I rang the door bell but there was no answer. I sat in my car
outside the house but the door did not open and no one arrived.
At 10.00 o'clock I walked up the short drive, lifted the stone
and there was the key.
However you do not have to hunt the key as many
locked church have a notice board at the gate or in the porch
giving the name, address or telephone number of the key holder.
The house is often very near the church so always take a mobile
phone. In every case case I have found the key holders more than
happy to help. Sometimes they go along with you and are always
very pleasant if, at sometimes, rather garrulous. Of course they
are keeping a watch on you but often will give you interesting
information about the church.
If you are planning a special journey to visit
a church it is always advisable to write, telephone or e-mail to the vicar, rector
or whoever is in charge of the church to ask if and when the church is open and if it is not who is
the key holder. It is wise to mention the purpose of your visit.
Always write in good time as with large teams of parishes the
post office may not know where to deliver your letter
immediately. The vicar of a small village may not longer live in
the vicarge and the rector of Microtown may no longer exist.
Always state clearly that your photographs are for personal or
academic use and never for personal gain orcommercial purposes.
If they really are for a commercial purpose do state this as there may,
quite reasonable, be some
financial arrangement involved . The contact
details are now very often on the internet and very often on a
site called A Church Near You. These normally give an
e-mail address of the vicar, rector, priest-in-church or other
contact for the church in question. However the internet is not
always as up to date as we should like it to be and if your
e-mail receives no reply and has not bounced back it may be that
there is no one at the other end because the church is in
interregnum. If you then write to the church you letter may well
be delivered to the right person as the post office and postmen
and women have more initiative and intelligence than the
internet!
Even if you are not planning a special journey
and you know the church is kept open, it is always polite to ask
the church authorities for permission to take photographs
anyway. I have never to date been refused this. Cathedrals and
some large churches, such as Tewkesbury Abbey, have a help desk
where you may ask for permission. For a cathedral you write to
the Dean: he's in charge and will pass on your letter to the
head verger, publicity officer or whoever deals with such
letters. Some cathedrals charge an entry fee, some charge a fee
for photography (and give you a stick on badge!) but these are
not only variable but curious. Sometimes there is an extra
charge for tripods while sometimes they are not allowed at all
during certain times; this is quite reasonable when the large
churches have a large number of visitors. Sometimes flash is
reasonably subject to certain restrictions.
I have once been refused permission in a
cathedral and that
was by Durham but they have now changed their rather unfortunate policy
in this matter. Yes, you could
obtain permission before their recent enlightenment but you had
to ask for this in writing beforehand, the cost
was restrictively high, the time you could spend severely
limited, you were not allowed to include members of staff or
children in your photographs, and you were not allowed to use
either flash or tripod. This is mentioned on the Durham page.
Westminster Abbey does not allow photography (they want to sell
you their own large collection of photographs!) but I probably
could not afford to visit this most expensive church anyway. I
think St Paul's Cathedral does not allow photography but Amanda
did take large number and presumably wrote for and was given permission.
|
Photographing Monuments |
Church Monuments are difficult to photograph:
earthquakes aside the monument is highly unlikely to
move but you might. Because church interior are often on
the dark side you may well need a
long exposure to
allow enough light through the lens into the camera.
The are three way of controlling this:
| 1. Shutter speed |
2. Aperture of the
lens |
3. Film speed - or
on a digital camera, effective film speed |
 Shutter speed tells you how long the shutter is open; it
should rather be called shutter time. On the more
professional cameras you can set this at anything from
1/8000 second to 30 seconds or even minutes or hours if
you control this yourself. The longer time the shutter
is open (confusingly a long shutter speed) the more
light enters the camera. Ideal for church interiors?
Yes, but if you hand hold the camera on anything more
than 1/50 sec you will get 'camera shake', unless you
have a steady hand. So the camera will need supporting
on a fixed surface - or you can use a tripod. Both of
these can be limiting, of course. Shutter speed tells you how long the shutter is open; it
should rather be called shutter time. On the more
professional cameras you can set this at anything from
1/8000 second to 30 seconds or even minutes or hours if
you control this yourself. The longer time the shutter
is open (confusingly a long shutter speed) the more
light enters the camera. Ideal for church interiors?
Yes, but if you hand hold the camera on anything more
than 1/50 sec you will get 'camera shake', unless you
have a steady hand. So the camera will need supporting
on a fixed surface - or you can use a tripod. Both of
these can be limiting, of course.
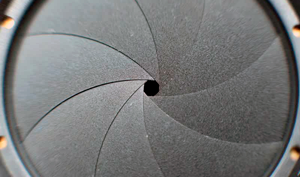
Aperture tells you how wide the lens is open which is
controlled by a clever diaphragm. This is given by
those F numbers but, confusingly, the small the number
the wider the aperture. This is because it's a ratio and
this actually does make sense but I will not go into
that here. The wider aperture the more light enters the
camera. So problem solved for photographing in bad
light: just use a wide aperture? Sorry, no that
won't work either: you didn't really expect it to. The
problem here is that the wider the aperture the smaller
the depth of field. This is if you focus on
something it tells you how far behind and in from of
that something, things will still be in focus. This can
be solved by taking photographs with the subject as flat
as possible. By that I mean do no photograph an effigy
from the feet looking towards the head for if you have
set the focus on the feet, the head will be out of
focus; so take it from the side.
You can see the effect of small apertures like this. If you need reading
glass try looking at text without them: it's blurred,
out of focus. Now make a tiny aperture with
your index finger and thumb and try again: suddenly you
can read it. A good technique if you forget your specs
although you might look rather eccentric. Although
someone
might offer to buy you some spectacles! blurred,
out of focus. Now make a tiny aperture with
your index finger and thumb and try again: suddenly you
can read it. A good technique if you forget your specs
although you might look rather eccentric. Although
someone
might offer to buy you some spectacles!
Film speed. This tells you how fast or slow this
film is, meaning that a fast film will need less light
to expose it correctly than a slow film. So you will be
able to set a shorter exposure on your camera than with
a slow film. Film speed was set by an ASA number: most
films were 80, 200, or 400 ASA, not at all a big range.
You can also 'push' films to a higher rating if you're a
crack hand in the dark room. Will this help? By now you
will expect there will be a trade off: the bigger the
ASA number, the grainier the photograph will look. It
was only the most sophisticated cameras which allowed
you to remove one film and then insert another and then
swap it for the original again.
Help is on its way. On
digital cameras it is possible to adjust to 'speed' or
sensitivity of the film sensor, pushing it up to 25,000
and beyond. A trade off? As you push the speed up the
result becomes 'noisier' but the effect is most quite
acceptable and I regularly push up the speed. For small
images this works very well indeed.
Flash. This would seem to solve all the problems
but not as easily as you might think or hope. First of
all the usual flash on the camera with give a flat,
washed out photograph but there another problem
reminiscent of depth of field, as defined above. Any
light will produce increasingly dimmer and dimmer
illumination with distance; yes, you can see that light
bulb way over there but I will hardly illuminate you
surroundings in the dark. Flash behave in the same way
of course.
The other problem
|
| |
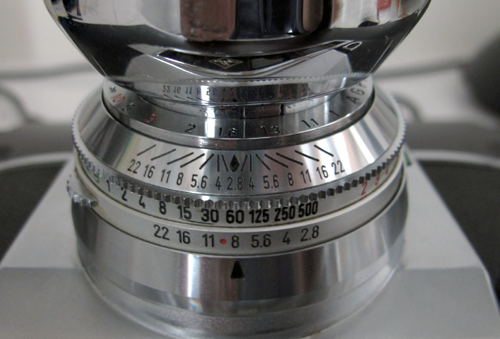
1. My old Agfa camera which
must be half a century old and which cost me £10! The
rings round the lens from the bottom up are:- 1. This
controls the aperture and is set on f8. The controls the
shutter speed, which is set on 1/60 of a second. 3. This
seems to repeat the aperture number and work with
the focusing ring 4. As you turn the ring to the diamond
shaped marker to set the number of feet (yes feet
remember) the lens with focus on, say, 1.6 feet as
in the photograph. If you follow the lines down from the
f numbers they will show you how much in front and
behind the subject will be in focus. Almost nothing ar
f2.8 but better as the aperture gets small toward
f22. The range is small at close focusing range
but improve dramaticall with distance.
Notice how the background is blurred in the photograph as i used a
large aperture and focused close up.
2. Yes like that but smaller...much smaller.
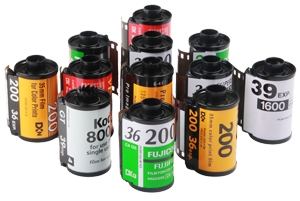
3. 35 mm film cassettes with speeds from 200 to what was then a whopping
1600 ASA.
|
| The Aperture |
 |
 |

 |
| You can just about see the iris diaphragm
through the lens of this (not my) Leica. I had to turn
the camera green to make this possible |
And here's whay it looks like in close up. |
Top: Diagrams of how it works.
Bottom: As ever, nature got there fist and it's
all, unlike the earlier cameras, automatic! |
Do it yourself. At night turn off the lights
and look in a mirror - the iris open and produces
a large pupil; now turn the lights on - and the iris
closes and produces a small pupil.
As you get older the process becomes slower. |
| Saving
& Corruption: A Warning |
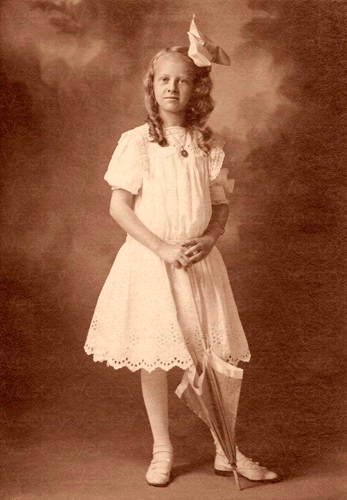 |
My great-grandma was quite a feisty girl
|
|
Some years ago I took a large number of
photographs in York Minster and Worcester Cathedral,
uploaded them to my computer then compressed and reduced
them for this site, where they remain. I then saved the
photographs from these two cathedrals and several
other places onto a disc as was
then the procedure. I saved all of the photographs I had
taken elsewhere onto a seies of discs too. When USB keys
arrived, I transferred all the material from these discs
to several keys, the latter being smaller, much more
convenient and, I believe, less prone to problems. All
of the photographs on the discs were accessible except
those from York and Worcester: this particular disc had
become corrupted for no reason that I could ascertain
and all the photographs were lost. This particular disc
was made by Phillips while all of the others were made
by other companies and were fine.
I wrote to Kodak about this problem,
asking them what was the best way to store photographs.
They replied that digital images were actually prone to
failure as my series on the Philip's disc had failed
and, futhermore, technology is advancing so quickly that
stored material that one has today may no longer be
accesible on a device of tomorrow. We have all seen
this, of course: programs that ran on an earlier version
of Windows will not run on a later version. Kodk's advice
was to print the photographs on photographic paper and
store them in the dark at an even temperature. This
sounds sound advice as we can still look at our
Victorian ancestors in photographs taken well over a
century ago. Even a photograph which has faded, stained
and cracked can be restored at least somewhat by an
experienced amateur and even be restored to its original
form by an expert. Whereas my photographs from York and
Worcester are lost and gone forever.
The cynical amongst you will say that
Kodak was trying to sell me lots of their photographic
paper. However they were, as I have shown, quite right
Sound recordings have a similar story:
I like the folk recording made by Moe Ash of Woody
Guthrie, Cisco Houton and others recorded in the mid 1940's
and recently a batch of the metal masters were
discovered which are as clear today as when they were
recorded. How long do casette tapes last and who
invented them I wonder? |
|
Digital photograph of the monument to
Prince William of Hatfied taken in York
Minster a few years ago. |
|
| In Praise of Digital Cameras |
Church monuments are difficult to
photograph and churches are difficult places in which to take
photographs: digital cameras have made life a good
deal easier for the church interior photographer.
A good quality film camera can, in my
experience, takes a far better photograph than an
equivalent digital camera but there are many problems.
Churches are often dark and the monuments often in even
darker corners. If you have loaded your camera with a
400 ASA film, you're in trouble straight away. You can
open your lens to full aperture (causing loss of depth
of field) but the exposure time is still too long to
hand hold the camera so you have to resort to a tripod,
which limits your choices of camera position. You can
change to faster films, if your camera allows it, or
'force' the film on development but this needs
considerable experience - as well as a dark room. Or you
can use flash. A flash, either built in or a separate
flash gun on the camera, gives a flat, washed out look
to the photograph with harsh shadows and if you attempt
to take a photograph with some depths the light from the
flash falls off rapidly with distance giving a very
unsatisfactory appearance. You can use multiple flash of
course but you do need a lot of experience and a lot of
equipment.
Of course with film photography you
will never know what you have recorded on the film until
you have developed it.
The first digital cameras - which
appeared in the 1990's if I remember correctly - were
basic and expensive: I neither wanted not could afford
one. But progress has been amazing. There is no problem
with film speed: my camera will go to an effective film
speed of 25,000; some will go even higher, so you can
take photographs almost in the dark. Quality
deteriorated using these high figures but even this is
getting better. You can see on the camera's screen
exactly how the photographs will turn out so no waiting
in the dark room. You can used multiple flash and see
exactly what the result will be at once. You can hold
the camera at, say, a high angle without looking through
the viewfinder and see on the screen what you have
captured. Some cameras have fold out screens so you can
see what you will capture even before you take the
photograph.
All of this you can attempt with a film
camera but 'blind' camera work is often
disappointing.
Multiple trial photographs of the same subject leads to
using a considerable amount of film, with the additional
cost.
Do not with a digital camera forget to
charge your battery or better still take a spare.
|
|
Drawing |
Pencil drawing is an excellent method for
producing good accurate rendering of church monuments
while in
the church. This is what the etchers such as Charles
Stothard and Thomas Hollis used to do all those years
ago to obtain preliminary drawings for their finished work. I
use a series of pencils from hard to soft with which it
is possible to produce clear lines and good shading.
High lights can be added by using a plastic eraser to
lighten the shaded area. But pencil drawings, no matter
how fine they look, do not reproduce well on the
internet.
Pen and ink drawings are ideal for this
purpose and reproduce very well indeed; the can even be made
to look rather like an etching.
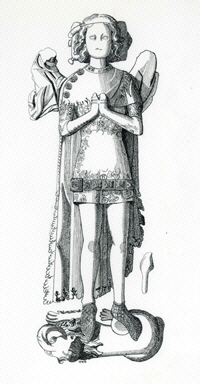 I
executed this drawing of Prince William of Hatfield,
young son of King Edward III by copying an etching by
Charles Stothard. How he produced his original drawing
is a mystery! I
executed this drawing of Prince William of Hatfield,
young son of King Edward III by copying an etching by
Charles Stothard. How he produced his original drawing
is a mystery!
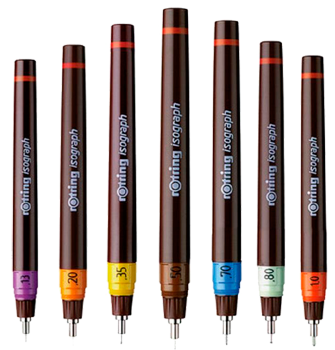
My drawing was executed by using a series of Rotring
pens (which used to be used by architects) on a
special paper called CS10 which was manufactured by Frisk.
The pens have a tubular nib which is best used
perpendicular to the paper and can be used with
Indian Ink. They do give very fine results indeed. The pens are still
available although
very expensive now; they can also
be infuriating: the pens, especially the fine ones used
in the drawing are apt to block from time to time.
Shaking them often unblocks them but there is a danger
of a blot of ink ending up on yours nearly finished
drawing or, perhaps even worse, on the floor. Be careful
not to lose your temper with the pen: violent shaking
can result in the nib hitting the desk and then you
might as well throw the pen in the bin.
Fisk CS10 paper, unlike the confounded yet wonderful pens,
was truly magic. It had a hard surface which sort of
went right through to the back so that you
 could
correct a mistake, remove a blot
and, especially
useful, gently scratch the line with a scalpel to make it
less black which made the drawing, as may be seen,
resemble an etching. If you removed an error there would be still a usable
drawing surface below. The surface itself takes a fine
line without it spreading: some papers are almost like drawing
on blotting paper in this respect. I used to scratch out with a number 15
Swann-Morton blade, then use an ink eraser or stick and
finally polish the paper with a pencil eraser. could
correct a mistake, remove a blot
and, especially
useful, gently scratch the line with a scalpel to make it
less black which made the drawing, as may be seen,
resemble an etching. If you removed an error there would be still a usable
drawing surface below. The surface itself takes a fine
line without it spreading: some papers are almost like drawing
on blotting paper in this respect. I used to scratch out with a number 15
Swann-Morton blade, then use an ink eraser or stick and
finally polish the paper with a pencil eraser.
Alas, Frisk ceased production of CS10
paper years ago, so long ago that I have not been able
to fine a photograph of the drawing pad on the internet.
They continued making a board for a few years but that
too is now no longer produced. I do have a few - very
few - sheets left but after that? I have never found a
replacement to CS 10; art dealers have sold me what they
told me was an equivalent but it never was and would not
do what the old magic paper used to do.
 |
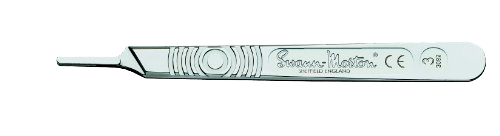 |
| Swann-Morton
scalpel handle and detachable blade. You can buy
'disposable' all in one scalpels but they don't
feel as robust. With these the handle is
tough and will last for ever; the blades are
carbon-steel and very sharp but will blunt. But
you have to inset and remove the blade so great
care must be taken. I hold the blade in its foil
container to do this and use it as a cover all
the time. Some people use forceps but they just
do not have the control, in my view. |
|
Printing
|
The earliest
illustrations of church monuments were produced by
intaglio printing; these are also the most
beautiful. This, of course, was well before the
invention of photographs and the first stage involved
drawing by pencil the monument in the church, a very
difficult task in itself and I greatly admire the
artists who undertook this skillful work. The image is
then transferred onto a metal plate by creating a number
of lines cut into this plate, the various tones being created by
varying the depth of the line and by cross hatching.
There are other methods and one of these will be briefly
mentioned below. The plate is then inked and passed
though a press producing a print. The plate is then
cleaned and another print made although eventually the
plate will begin to show signs of wear. Different
artists may be involved in the different processes of
this work.
Can you see a problem here? The image on the
plate has to be reversed otherwise the resulting print
will itself be reversed. However there are ways around
this problem, obviously, but I won't describe the
minutia here. Two methods of producing the plate will be
described below
Engraving
In this process the lines are cut into
the metal plate (a steel plate in the example shown) directly by using a tool called a burin.
The depth of the line is controlled simply by
engraving it more deeply. This is very skillful work and
very lengthy, taking days, weeks or months to complete a
plate. Woe betide you should you make a mistake: you
just do not! However the results are truely magnificent:
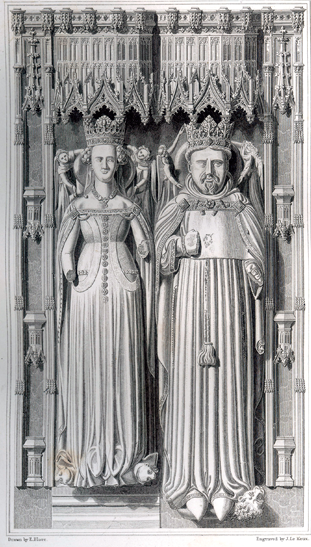
look at the engraving of King Henry IV and his Queen,
Joan of Navarre on the right. Here the drawing was
executed by architect
Edward Blore which was a major achieving in itself
and if you are familiar with this monument you will,
like I am, baffled by how on earth he managed to do it!
As is sometimes the case the another hand carried out
the engraving: here it was
John Henry Le Keux. I certainly admire the skill of
these Victorian gentlemen.
I have never attempted engraving and, because I
do not have the skill to do so nor the time to develop
that skill nor a master to teach me, certainly never will. I
have tried to use a burin on a cupper plate which was
easy enough but to execute a full detailed plate is
certainly another matter.
The plate then has to be printed and the is dealt
with in etching below. Etching was introduced
because the process is speeder than engraving and this
is now described below.
Etching
 The term etching
strictly refers to the process of cutting a line in a
copper plate by a chemical process; the end result, often
called simply etchings, are prints.
The term etching
strictly refers to the process of cutting a line in a
copper plate by a chemical process; the end result, often
called simply etchings, are prints.
In
this process
the copper plate again has lined cut into
it like engraving but the process is very different. The
copper plate is cleaned and covered with a ground,
a waxy like substance that is melted onto the plate
lying on a hot plate. The back of the plate will
probably already be covered in a resistant layer but, if
not, a ground is painted on. The ground is to prevent
the etchant liquid - often nitric acid or a similar
material - from beginning to dissolve the copper.
Then the drawing is transferred to the
plate - remembering to reverse it - so that there is a
fairly simple line drawing on top of the ground.
The ground is then scratched away using an etching
needle, in a series of lines and cross hatching. Unlike
in engraving you cannot make the lines deeper at this
stage. Drawing like this on the plate is called
needling.
When ready the plate is immersed in the
etching agent - usually nitric acid or ferric chloride - for a measured length of times - several minutes
- and then removed. It is then washed and
examined. If you want the lines deeper to give a
stronger line on the forthcoming print the other lines
are stopped out by painting a liquid varnish
over these lines. The plate is then returned to the
etchant bath and again left for several minutes but this
times the etchant will only bite into the lines which
have not been stopped out. This process may be repeated
several times etching deeper and deeper lines. This
process require a good deal of experience to
acquire the necessary skill.
The plate is then removed from the bath,
washed and the ground removed by a solvent. Hopefully we
are now ready to print but the plate could be reground
again and re-etched or the line could be deepened by an
engraving technique or even lessened by careful scraping
and sanding.
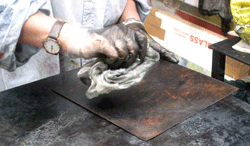
Initially the copper plated is
inked: the aim is to cover all of the plate
with ink and especially to force the ink into all of the
etched lines on the plate. Etching ink is very thick and
this
 work
is carried out with the copper plate placed on a heated
bed. Black ink is shown here but all colours are
available. You can also produce coloured prints with
different coloured inks but this is beyond the scope of
this short article and certainly well beyond my skill!
This is very messy work! work
is carried out with the copper plate placed on a heated
bed. Black ink is shown here but all colours are
available. You can also produce coloured prints with
different coloured inks but this is beyond the scope of
this short article and certainly well beyond my skill!
This is very messy work!
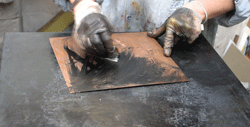
Next you wipe the ink off
again! Well, not all of it just that which is on the
surface of the plate and not in the etched lines,
obviously. This is a difficult procedure as if any ink
is left on the surface you will end up with a dirty
looking background when you come to produce the first
print: and then you will have to wipe all of the ink off
the plate and start all over again.
Now you are ready to print the plate:
the copper plate in laid on the bed of the etching
press, which is special press rather like an old
fashioned mangle, protecting the bed with clean paper to
avoid any ink marks. This is covered by the dampened
paper, by a protective paper layer and a series of thick
blankets to even the pressure from the rollers You turn the wheel and the
bed with the plate and the paper passes between two
rollers.
|
| |
| The
Artists |
Charles Alfred Stothard
George Hollis (1793-1842) & Thomas Hollis
(1818-43) Father and son who began work on what
was to be a continuation of Charles
Stothard's
Monumental Effigies of Great Britain in 1839,
following the premature death of the latter. George is
described as an engraver and his son, Thomas, as a
painter and draughsman. Initially Thomas executed the
drawings while his father made the etching plates.
George died in 1842 so then Thomas continued the work
alone, executing the original drawings as well as making
the plates. Unfotunately Thomas died of
tuberculosis the
following year at the early age of twenty-five so
the work was never completed.
Their work was published by the same publisher as was
the work of Charles Stothard.
|
|
|