Introduction (What's it all about?) Before the Beginning (Making images) The Camera Obscura The Beginning (Tom Wedgewood creates Shadowgrams) Fixing It (Nicépore Niépce takes the first Heliographs) Improving It ( Louis-Jacques-Mandé Daguerre introduces the Daguerrotype) Crossing the Channel (Fox Talbot and tales of self interest) Calotypes (The beginning of the - types)
Albumen Prints (An avian diversion) The Wet Collodion Process (Intoducing an English hero) Interlude (Some Victorian Photographers) The Dry Collodion Process (Seek and you won't find)
The The Ambrotype (A variation)
 If you were to ask
who invented photography and when, you would not receive a simple answer:
not the simple answer you would be given, for example, to the question, 'Who
invented the jet engine?' But it is
If you were to ask
who invented photography and when, you would not receive a simple answer:
not the simple answer you would be given, for example, to the question, 'Who
invented the jet engine?' But it is not impossible to answer either, as
would be a query on the inventor of the wheel. There were a number of
'inventors' and 'pioneers' - not always quite the same thing: one,
already a wealthy man of leisure, saw it as a way of making even more
money, while another, saw his aim being to make photography available to
everybody. The latter, a man of clearly very different values to the former,
indeed became a very wealthy man - but also a major philanthropist, one
from whom I and many others, have benefitted both directly and
indirectly. Asking what photography actually is would seem a rather
naive question, although it is one which is not unrelated to the history
and development of the subject. First of all, you have to project an
image of what you actually see onto a surface; that is relatively simple
with a pin hole but even better with a lens; lenses have an
entirely different history and development being used well before
photography in optical instruments, such as telescopes. Then you have to make the image remain when you remove the
lens. That is going to be difficult! And then you have to develop a way
of reproducing that image over and over again: that is yet another
problem to surmount. However all this is what we see as photography now.
On another level, eleven year old Amelia would think it very strange that
we had to take our films to the chemist to be 'developed' and could not
see them immediately.
not impossible to answer either, as
would be a query on the inventor of the wheel. There were a number of
'inventors' and 'pioneers' - not always quite the same thing: one,
already a wealthy man of leisure, saw it as a way of making even more
money, while another, saw his aim being to make photography available to
everybody. The latter, a man of clearly very different values to the former,
indeed became a very wealthy man - but also a major philanthropist, one
from whom I and many others, have benefitted both directly and
indirectly. Asking what photography actually is would seem a rather
naive question, although it is one which is not unrelated to the history
and development of the subject. First of all, you have to project an
image of what you actually see onto a surface; that is relatively simple
with a pin hole but even better with a lens; lenses have an
entirely different history and development being used well before
photography in optical instruments, such as telescopes. Then you have to make the image remain when you remove the
lens. That is going to be difficult! And then you have to develop a way
of reproducing that image over and over again: that is yet another
problem to surmount. However all this is what we see as photography now.
On another level, eleven year old Amelia would think it very strange that
we had to take our films to the chemist to be 'developed' and could not
see them immediately. It all began, as you might have expected, with the Chinese
of long ago: in the fifth century B.C. A writer describes passing
sunlight through a pin hole in one wall of the box and being able to see
an image of the outside world projected onto the opposite wall of the
box. That was approximately when it was first described,
although it may well have been discovered long before that.
Think of the model of 'rays' of light bouncing from an object, and
passing through the pin hole, then a 'single ray' from a single point of
the object will pass though the pin hole and land on a single point on a
surface behind the pin hole. All the other 'rays' will land somewhere
else. However all the 'single rays' from every single point on
the object will also pass through the pin hole and land on the surface
as a single point as the first, but in a different place. All the other
rays from the object will again travel elsewhere. You will then see an
upside down image on the surface of the box behind the screen.
It all began, as you might have expected, with the Chinese
of long ago: in the fifth century B.C. A writer describes passing
sunlight through a pin hole in one wall of the box and being able to see
an image of the outside world projected onto the opposite wall of the
box. That was approximately when it was first described,
although it may well have been discovered long before that.
Think of the model of 'rays' of light bouncing from an object, and
passing through the pin hole, then a 'single ray' from a single point of
the object will pass though the pin hole and land on a single point on a
surface behind the pin hole. All the other 'rays' will land somewhere
else. However all the 'single rays' from every single point on
the object will also pass through the pin hole and land on the surface
as a single point as the first, but in a different place. All the other
rays from the object will again travel elsewhere. You will then see an
upside down image on the surface of the box behind the screen.Perhaps not the best of images as a bright day is required and the image will be rather dark but it's start. A lens will solve this problems by making many 'rays' of light coming from a single point on an object bend and so be focused onto a single point on the screen producing a much brighter image...and so on with all the multiple rays coming from single points on the subject all bending onto single points on the screen image. As long as they actually pass through the lens, of course. Lenses also date back to antiquity, the first ones being made from materials such as naturally occurring crystals.
 |
 |
|
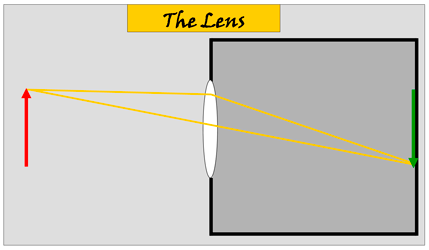
| Above. The rays of light
(yellow) are reflected from the tip of the red arrow in all
directions but only one ray
actually passes through the pinhole. This will happens to all
the rays of light reflected from every part of the arrow. This
will produce an inverted image of the arrow (green) on the screen
on the wall of the box opposite the pin hole. NOTE: this is a simply a explanatory model of what actually happens: light does not consists of separate individual rays. |
Above: The lens does exactly the same things but
differently and better. All rays of light reflected from the top
on the red arrow will be 'bent' by the lens and so focused to a
single point on the screen on the wall opposite the lens.
This will happen to rays of light from all other parts of the
arrow so an image (green) of the arrow will be produced on the
screen and again upside down. But a brighter image as more than
one ray is producing it. NOTE: a simple lens will certainly not do a perfect job: not all rays will be brought to exact focal points and the lens will focus various colours slightly differently. This is corrected by using a complex combination of simpler lenses. |
| The World Turned Upside Down An Intriguing Diversion |
||
 |
The above models are basically similar to
what occurs in the eye: the lens (actually, not just the
lens but rather a series of surfaces) produces an upside down image
of the world on the retina. As the eye is more or less spherical
it will be a curved image as well. The brain cleverly turns the
image the right way up so movement and everything else are
correctly co-ordinated - and removes the curvature. If you wear special prismatic glasses
which turn the world the 'right way up' on the retina, the brain
will invert it and you will see it upside down. In a short time
the brain will correct this and you will see the world the right
way up, even though it has been inverted from its original
position on the retina. If you remove the spectacles, you will
still see the world upside down again until the brain does its
homework again. |
 |
 All this can be put this to a practical use and so solve the
first stage in the problem of producing photographs. Enter the
camera obscura ('dark chamber') as early as the 13th century; this was a
darkened room with a pin hole in a wall which produced an inverted
image of the outside world on the opposite wall of the room. This could
be used for observing, for example, solar eclipses quite safely as
well as simple entertainment. By the 16th century such devices had
developed into a portable box with a lens at one end and a ground glass
screen on the other. These devices could then be set up
anywhere, aiding artists, for example, to record a scene on paper with the correct
proportions and perspective; this could then be built up further in the studio
at a
later time. Leonardo da Vinci was an early user of the camera obscura in this
way.
All this can be put this to a practical use and so solve the
first stage in the problem of producing photographs. Enter the
camera obscura ('dark chamber') as early as the 13th century; this was a
darkened room with a pin hole in a wall which produced an inverted
image of the outside world on the opposite wall of the room. This could
be used for observing, for example, solar eclipses quite safely as
well as simple entertainment. By the 16th century such devices had
developed into a portable box with a lens at one end and a ground glass
screen on the other. These devices could then be set up
anywhere, aiding artists, for example, to record a scene on paper with the correct
proportions and perspective; this could then be built up further in the studio
at a
later time. Leonardo da Vinci was an early user of the camera obscura in this
way.By the 18th century it began to be wondered if this very temporary image produced by the camera obscura could be preserved in some way and so rendered permanent. Preserving the image and then rendering it permanent will be found to be two separate processes.
 One of the first experimenters in this
process was Tom Wedgewood, youngest son of the famous potter Josiah, in
the 1790's. He applied silver nitrate solution to paper and produced
what he called shadowgrams by laying objects with
varying degrees of opacity, such as
leaves or insect wings, on the paper and exposing them to the light.
What occured was that the light passed readily through the more
transparent parts of the objects and turned the paper black, while the
light passed through more opaque areas less readily so these areas were
turned into shades of gray on the paper. So what was obtained was a
negative of the image, with the light areas dark and the dark light
areas light. Tom found that applying silver nitrate to white chamois
leather produced a better result, possibly because this material
absorbed more of the solution.
One of the first experimenters in this
process was Tom Wedgewood, youngest son of the famous potter Josiah, in
the 1790's. He applied silver nitrate solution to paper and produced
what he called shadowgrams by laying objects with
varying degrees of opacity, such as
leaves or insect wings, on the paper and exposing them to the light.
What occured was that the light passed readily through the more
transparent parts of the objects and turned the paper black, while the
light passed through more opaque areas less readily so these areas were
turned into shades of gray on the paper. So what was obtained was a
negative of the image, with the light areas dark and the dark light
areas light. Tom found that applying silver nitrate to white chamois
leather produced a better result, possibly because this material
absorbed more of the solution.However when taken into anything brighter than candle light, the impregnated paper simply turned black all over causing the image to dissappear: the light had simply blackened the paper all over the treated surface. The image could be preserved - at least for a time - by its being kept in the dark and only viewed by dim candle light.
The bit of chemistry in the box below shows what is actually happening at an atomic level and points the way to how the process needs to move forward: light turns silver salts black, by releasing metallic silver, but this process needs to be improved, and then the silver salts need to be removed while retaining the silver image. We will meet silver salts and the terms developing and fixing as the story unfolds.
| Ag+ Br - + γ = Ag+ + Br + e - |
| On the left is an molecule of silver bromide, which consists of a silver ion (represented by Ag+ ) and a bromide ion (represented by Br -). The bromide ion absorbs a photon of light (represented by γ). The photon knocks an electron (represented by e - ) out of the bromide ion, which leaves a bromine atom (represented by Br) and a spare electron. |
| Ag+ + e - = Ag |
The silver ion then absorbs the electron turning it into a silver atom. Easy when you know how it's done! Simple looking, perhaps, but it took Albert Einstein to explain the principles of this strange effect, the begining of wave-particle duality and quantum mechanics. |
 |
| Nicépore Niépce (1765-1833) |
 1820's. He
resigned from public office to join
his elder brother, Claude, pursuing various inventions, including
the first
internal combustion engine. Note the
word fix is used here in a slightly different
sense from that which will be used later in describing the processing of
black and white films: for now it will mean rendering the Wedgewood
images permanent, and then going beyond this to those produced
by a camera obscura, a path which M. Niépce was to follow.
Initially around 1816 - according to letters exchanged with his
sister-in-law - M. Niépce created images on paper impregnated with
another silver salt, silver chloride, using the camera obscura, the
first person recorded to have done so. These images were negatives: the
white areas were black and the black areas white and, as Tom Wedgewood
had discovered earlier, they turned black when exposed to bright light. However
these were the first images, what we would call photographs, ever taken. He tested
various other light sensitive chemicals, eventually using
asphalt or
bitumen ,
a viscous liquid, which was used at the time as a ground for etching
(Q.V. in Drawing the Line). He dissolved this material in the
essential lavender
oil producing a varnish which he painted as a thin coat on stone, metal,
or glass. When this varnish was dry M. Niépce then used the prepared
plate, to produce what he referred to as heliographs - or 'sun drawings'.
1820's. He
resigned from public office to join
his elder brother, Claude, pursuing various inventions, including
the first
internal combustion engine. Note the
word fix is used here in a slightly different
sense from that which will be used later in describing the processing of
black and white films: for now it will mean rendering the Wedgewood
images permanent, and then going beyond this to those produced
by a camera obscura, a path which M. Niépce was to follow.
Initially around 1816 - according to letters exchanged with his
sister-in-law - M. Niépce created images on paper impregnated with
another silver salt, silver chloride, using the camera obscura, the
first person recorded to have done so. These images were negatives: the
white areas were black and the black areas white and, as Tom Wedgewood
had discovered earlier, they turned black when exposed to bright light. However
these were the first images, what we would call photographs, ever taken. He tested
various other light sensitive chemicals, eventually using
asphalt or
bitumen ,
a viscous liquid, which was used at the time as a ground for etching
(Q.V. in Drawing the Line). He dissolved this material in the
essential lavender
oil producing a varnish which he painted as a thin coat on stone, metal,
or glass. When this varnish was dry M. Niépce then used the prepared
plate, to produce what he referred to as heliographs - or 'sun drawings'.The property of bitumen that M.Niépce was to use is that when exposed to light it becomes less soluble than unexposed bitumen. The first experiments were similar to those which had been performed by Tom Wedgewood with his shadowgrams; however M. Niépce used, as mentioned, bitumen as a light sensitive material and engravings on thin paper instead of the leaves or insect wings. The dark lines of the engraving block the sunlight, while the lighter areas between the lines allows the sunlight to pass through. So the bitumen below the dark lines remains as before - relatively soluble - whereas the light areas between the lines, which have been affected by the sunlight, become more insoluble. There were two important difference: these heliographs could be rendered permanent and could be reproduced.
Now we move from the realm of early photography to that of etching, lithography and printing. The plate is now treated with the solvent which selectively removes the bitumen below the lines which have not been affected by light whereas the bitumen between the lines which have been subject to sunlight light remains. There are now two possible ways to produce a plate from which prints can be made: the remaining bitumen could act as a water repellant surface and printing could be done by lithography; alternatively, the plate could be etched by an acid which would bite the plate (if metal) only where the bitumen had been removed, below the lines of the engraved print, while not biting the areas still covered in bitumen. The bitumen could then be totally removed and the plate printed by the intaglio process (described in Drawing the Line). In other words, with the latter process, an engraving has been turned into an etching!
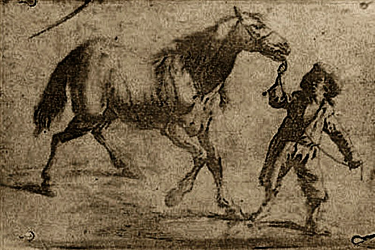
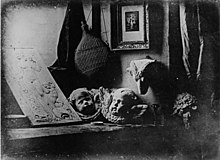
But this is not yet actual photography, being more akin to early photocopying. The results were, however, remarkably good as the copy of an 17th century engraving (top right) shows and these copies could
 be reproduced. This heliograph was produced around 1825,
the very first actually being produced in 1822 on a lithographic
stone but was accidentally destroyed.
be reproduced. This heliograph was produced around 1825,
the very first actually being produced in 1822 on a lithographic
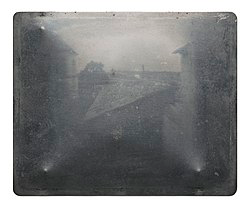
stone but was accidentally destroyed.Around 1824 M. Niépce began to combine his heliograph technique with the camera obscura in an attempt to produced what we would consider actual photographs. The first of these were lost, not successful or accidentally destroyed but the earliest one to survive was produced between 1826 and 1827 and is a view through a window of M.Niépce's house at St-Loup deVarennes.. This is shown on the right. It was once thought that the exposure time would have been between eight and nine hours, but a modern attempt to reproduced this photograph using exactly the same technique and materials that M.Niépce himself used shows that it probably took several days. Hardly photography as we know it today but this was the very first still existing example of 'light drawing' (that is, photo-graphy) .
Rumours of the work on the heliographs began to reach Louis-Jacques-Mandé Daguerre (see immediately below), who for many years had himself dreamed of a process that would fix the images produced by the camera obscura. M. Niépce and M. Daguerre met in Paris in 1827 while the former was on his way to London to visit his now sick brother, Claude, who had squandered the family fortunes pursuing their inventions. The two photographic pioneers formed a partnership in 1829.
The result of this partnership was the development of the physautotype; we will be hearing about many types of '-type' later in this short history. This process directly produced a photographic image without having
 to use a following process of etching or
lithography. The photographic agent in this process is lavender oil
residue, produced by heating lavender oil until it forms a dry residue.
A small amount of this material is then dissolved in alcohol and this
solution poured over a silver or glass plate or mirror; the alcohol is
then allowed to evaporate, leaving a white deposit on the plate. This
plate in then exposed in a camera obscura for about eight hours: a vast
reduction from several days. The plate is then turn upside down over a
bath of oil of white
petroleum, the fumes of which develop the image; this process takes
between five and ten minutes. Take note that the chemicals used up to
now are relatively benign and this is the first time we have mentioned
developing.
to use a following process of etching or
lithography. The photographic agent in this process is lavender oil
residue, produced by heating lavender oil until it forms a dry residue.
A small amount of this material is then dissolved in alcohol and this
solution poured over a silver or glass plate or mirror; the alcohol is
then allowed to evaporate, leaving a white deposit on the plate. This
plate in then exposed in a camera obscura for about eight hours: a vast
reduction from several days. The plate is then turn upside down over a
bath of oil of white
petroleum, the fumes of which develop the image; this process takes
between five and ten minutes. Take note that the chemicals used up to
now are relatively benign and this is the first time we have mentioned
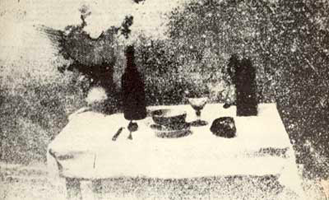
developing.Developing the image with these fumes causes the areas exposed to the light to remain white, in other words light renders the lavender oil residue progressively less soluble in the vapour while those areas less exposed to the light remain progressively more soluble. When viewed against a dark background these images will appear as positive or negative depending on the angle from which they are viewed. To the left is a later printed reproduction of a physautotype originally taken about 1832, but subsequently accidentally destroyed. The vast improvements may be seen.
Nicépore Niépce died suddenly in 1833, financially ruined by the inventions he and his brother had developed but had been unable to capitalize upon. So much so that the commune paid for his grave in Saint-Loup de Vienne. which is near to the house where he had performed his experiments.
 |
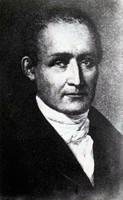
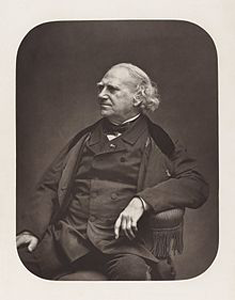
| Louis Daguerre (1787-1851) |
After the death of his partner, Nicépore Niépce, Louis Daguerre continued to experiment with image production but once more using silver salts, whose light sensitivity had been first demonstrated by German scientist Johann Heinrich Schultz (1687-1744) among others. M. Daguerre eventually perfected the Daguerreotype which he named, as can be seen, after himself.
M. Daguerre was unsuccessful at finding interested investors in his process so he took other steps to raise capital. Early in 1839 at a joint meeting of the French Academy of Sciences and the French Academy of Fine Arts his photographic invention was announced in outline although the actual details of the processes where not described. Under
 assurances of strict confidentiality Louis Daguerre
explained these
details to
François
Arago, the permanent secretary of the Academy of Science. The
latter was impressed by M. Daguerre's invention so members of the Academy of
Science and selected others were invited to examine the inventor's work
in his studio.
assurances of strict confidentiality Louis Daguerre
explained these
details to
François
Arago, the permanent secretary of the Academy of Science. The
latter was impressed by M. Daguerre's invention so members of the Academy of
Science and selected others were invited to examine the inventor's work
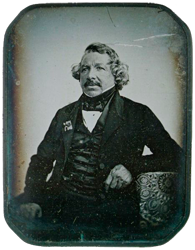
in his studio.Arrangements were made for M. Daguerre's rights to be acquired by the French Government in exchange for a stipend of 6,000 Francs yearly for life. The Government, recognizing Nicépore Niépce's contribution to the development of this work also awarded a stipend of 4,000 Francs to the latter's estate. The French Government had acquired these rights 'on behalf of the People of France' and later the same year full details and working instructions were published as a gift from France 'free to the world'. To the right is the first reliably dated (1837) Daguerreotype. How these photographs were actually produced is given in the box below.
| D. I. Y. Daguerreotypes | |
| 1. | Polish a plate of silver plated copper, which must be free of tarnish or other imperfections, to a mirror finish. This must be done not long before use of the plate. Originally this was done using a buff covered hide or velvet and with, successively, rotten stone, jeweler's rouge, and finally, lampblack. The plate is then swabbed with nitric acid to remove any residual organic matter. |
| 2. | Treat the plate with fumes to render it light sensitive. This is done in the dark, or under a safe light, by subjecting the plate to halogen fumes, to give it a fine, light sensitive coating of silver halide. Originally iodine was used to give a coating of silver iodide, but later bromine was found to produce a coating of silver bromide, which proved to be more light sensitive. Chlorine was also used. There was then a final fuming with iodine. |
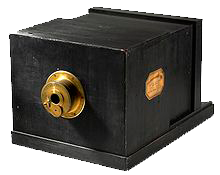
| 3. | Expose the plate in a camera for a few seconds or longer depending on the brightness of the subject. The result is a latent image of the subject on the plate. In the dark room the light sensitive plate is placed in a light tight plate holder and carried to the camera (below left) to be inserted into the latter. In the dark interior of the camera the light sensitive surface is uncovered by withdrawing a protective slide or opening a pair of doors in the holder. Uncapping the camera lens begins the exposure and recapping it ends it. |
| 4. | Fume the plate over mercury vapour so making the latent image visible ('developing') This takes several minutes in a specially designed box which holds the plate over heated mercury. A very faint image can be seen without development but with an unacceptably long exposure. Although the toxic properties of mercury were well known in the 19th century, precautions were rarely taken. |
| 5. | Wash the plate with a liquid chemical to render the plate light insensitive ('fixing'): a mild solution of sodium thiosuphate (know known as photographers' hypo or fixer) was used, although Louis Daguerre initially used a hot saturated solution of sodium chloride, that is 'common salt'. |
| 6. | Rinse and dry the plate |
| 7 | Seal the plate behind glass. |
The process now somewhat resembles that of processing (developing and fixing) of black and white films but with considerably more technical skill, lengthy and painstaking work and the use of toxic, irritant, and corrosive chemicals. However the image cannot be reproduced by photographic 'printing' in the way these films may be reproduced. It also resembles the early work of Tom Wedgewood and Nicépore Niépce in that the process again uses silver salts. It is certainly not for the happy snapper!
Various improvements were made to the initial process to shorten the still rather long exposure times of ten minutes or longer, even in good light: addition of sensitizing chemicals to the processing and the introduction of lenses that could transmit more light reduced the time to seconds rather than minutes The plates themselves are easily damaged so must be protected against
 scratches or corrosion and for this reason they
 are sealed behind glass; however,
this itself may cause other problems. The image is actually laterally
reversed because they are viewed from the side that faced the camera;
this may be corrected by placing a mirror or prism in front of the lens
when taking the Daguerreotype. This 'add on' must be of high optical quality
or the image may become distorted and, in any case, will reduce
the amount of light passing through the lens so making a longer exposure
time necessary. Daguerreotypes cannot be copied, in the sense
that a negative may be reproduced (printed); that will come. At the time they
were reproduced by making a
lithograph or etching of the original; now they may be scanned as can be
seen opposite.
are sealed behind glass; however,
this itself may cause other problems. The image is actually laterally
reversed because they are viewed from the side that faced the camera;
this may be corrected by placing a mirror or prism in front of the lens
when taking the Daguerreotype. This 'add on' must be of high optical quality
or the image may become distorted and, in any case, will reduce
the amount of light passing through the lens so making a longer exposure
time necessary. Daguerreotypes cannot be copied, in the sense
that a negative may be reproduced (printed); that will come. At the time they
were reproduced by making a
lithograph or etching of the original; now they may be scanned as can be
seen opposite.Daguerreotypes have a particularly beautiful appearance when seen as an original: the image does not appear to sit on the surface of the plate but, as the viewing angle changes in order to see a positive to negative image, it appears to float above the plate; this is similar to the small holograms that now appear on credit and debit cards. They also capture remarkable detail, the best examples being superior to modern digital images in this respect.
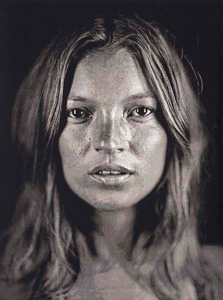
The Daguerreotype was the first widely used method of creating photographic images. It was succeeded around 1860 by less expensive processes which produced more easily viewed images such as the ambrotype. The Daguerreotype was in many ways the 'Polariod' of its time in that it was a one off and could not be printed, although it was very far from being quick and easy. The Daguerreotype was revived in late 20th century by a small number of artists and photographers, such as the American Chuck Close, who produced this beautiful image of model Kate Moss. It must, of course, be seen as the original, not as a scanned and printed copy, to produce the visual effect of the original.
 Days before the French Government
declared, after they had purchased the rights from the inventor,
that the Daguerreotype was a gift to the world from
the People of France, Louis Daguerre' s patent agent, Miles
Berry, visited London in an attempt to sell the Daguerreotype to
the British Government. He visited the Treasury to ask if the
Government would purchase the rights as had the French, and they would
then give the process as a gift to the British people, so 'preventing
the invention being fettered and limited by individual interest' And, of
course, presumably similarly awarding M. Daguerre a stipend. The
response of the Treasury was that the Government had placed no funds at
its disposal for which a purchase of this manner could be made. This
sounds all too familiar to me.
Days before the French Government
declared, after they had purchased the rights from the inventor,
that the Daguerreotype was a gift to the world from
the People of France, Louis Daguerre' s patent agent, Miles
Berry, visited London in an attempt to sell the Daguerreotype to
the British Government. He visited the Treasury to ask if the
Government would purchase the rights as had the French, and they would
then give the process as a gift to the British people, so 'preventing
the invention being fettered and limited by individual interest' And, of
course, presumably similarly awarding M. Daguerre a stipend. The
response of the Treasury was that the Government had placed no funds at
its disposal for which a purchase of this manner could be made. This
sounds all too familiar to me.But why England? Perhaps M. Daguerre had believed that there was a relationship between the Royal Society and the British Government similar to that in France between their Government and the Academy;
 if so, he had been mistaken. Miles Berry sold
a licence - but not the patent - to
Antoine Claudet (left), a French
photographer working in London, for £200. M. Claudet himself introduced
several innovations into photography, including the red safe light and
what appears to have been an early light meter and range finder. He was
one of only two photographers to buy such a licence.
if so, he had been mistaken. Miles Berry sold
a licence - but not the patent - to
Antoine Claudet (left), a French
photographer working in London, for £200. M. Claudet himself introduced
several innovations into photography, including the red safe light and
what appears to have been an early light meter and range finder. He was
one of only two photographers to buy such a licence.Mike Berry applied for an English patent; note that Scotland was not yet included in this patent law, which applied only to England, Wales, Berwick-on- Tweed, as well as all colonies and plantations abroad. This patent he then sold to Richard Beard, who sounds like a hard nosed entrepreneur of the worst type and who also took out a patent for Scotland. Richard Beard was a vigorous defender of his commercial interests, engaging in many legal actions. However he lost the case against Antoine Claude, who already held a licence.
So England, Wales (and the colonies) were the only countries in the world denied the French gift, which is why the Daguerreotype process did not develop in these places. This story is not only rather curious, inconsistent but rather vague: for example some references refer to Britain or the United Kingdom when England and Wales should be used. The best article I have been able to find may be read here
I will continue to research this topic.
 polymath who
 |
| William Henry Fox Talbot (1800-1877) |
Initially, around 1834, he began to research the salted paper technique to produce photographic images. This had, as explained above, been used before but in Fox Talbot's process the image was stabilized - 'fixed' - which had not been done in the earlier experiments with silver salts but was introduced in the Daguerreotype process. He appears to have perfected this process by the following year, although he did not reveal it until 1839, when he announced: '...the new process which I offer to the lovers of science and nature...' . Initially he created pictograms, which he called photogenic drawings; these are the same as Tom Wedgewood's shadowgrams, which he had produced late in the previous century. He then used the same process in a camera.
| D. I. Y. Salted Paper Technique | |
| 1. | Wet a sheet of ordinary writing paper in a weak solution of sodium chloride (i.e. common salt) |
| 2. | Brush one side with a strong solution of silver nitrate which by ion exchange, produces a coating of light sensitive silver chloride. |
| 3. | Expose the paper to light (see above). When this is judged to be have produced an adequate image, the exposure is stopped. |
| 4. | The image is then fixed by strong solution of sodium chloride. This alters the chemical balance, again by ion exchange. The paper is now insensitive to light and does not require to be viewed in very dim light. Later photographers' 'hypo' was found to be more effective for this stage. |
Note that this is a printing out process, that is the latent image is actually viewed as the final result; this image is not subjected to development. The exposure time was a long one, being one to two hours. The result, as before, was a negative of the subject photographed; however, as the writing paper was thin, it was translucent so a positive image (where black is black and white is white, rather than the reverse) could now be produced by using the negative to produce this positive as a pictogram. This was a major leap forward.
Late in 1840 Fox Talbot worked out a developing-out process, in which the latent image on the exposed sanitized paper is removed from the camera and then developed and fixed, rather then waiting quite a long time for it to appear on the sensitized paper. By using this process - which Louis Daguerre had employed with different but more toxic and corrosive chemicals - the exposure time can be reduced from hours to minutes. This was introduced to the public in 1841. It was called a Calotype (from the Greek meaning, beautiful impression) although it is sometimes called a Talbotype.
| D. I. Y. Calotypes | |
| 1. | Brush one side of good quality writing paper with a solution of silver nitrate. Dry and then dip in a solution of potassium iodide and dry again. The paper at this stage is relatively insensitive to light and so may be stored indefinitely. |
| 2. | When required brush the side initially treated with silver nitrate with a mixture of silver nitrate (again), acetic acid, and gallic acid. This latter is a phenolic acid. The paper is now coated with silver with silver iodide, again by the process of ion exchange. Blot lightly and the paper is ready to expose in a camera. |
| 3. | Expose in the camera |
| 4. | To develop the faint latent images, brush on more of the silver nirate, acetic acid and gallic acid while warming the paper. |
| 5. | When development is considered complete the paper is rinsed and blotted to dry the paper |
| 6. | Stabilize or 'fix' the image by washing in potassium bromide solution. This converts and remaining silver iodide into silver bromide, which is considerably less sensitive to light. In fact it slightly discolours when exposed to light which may be considered acceptable. To totally fix this calotyope a hot solution of photographs' hypo' (see above) may be used: this will dissolve and remove any silver halides, leaving only metallic silver. |
| 7. | The paper is translucent so a print can be made. This was normally made by the salted paper technique, as in making pictograms as described above. Other techniques were available but they were not as simple to employ as well as being more expensive. |
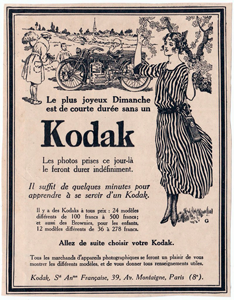
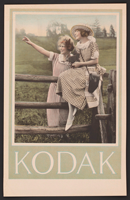
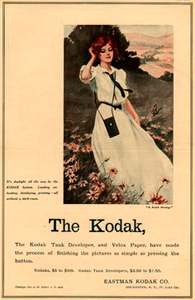
This is now beginning to look like the modern process for producing black and white photographs, although it has quite a long way to go yet. But the next improvements will be essentially refinement - although major ones - of the Calotype. With this latter process you had to 'make' your own 'film' and used it immediately and then print it yourself, both processes using solutions which again you had to make yourself. It will be a while yet before you can buy a film from a photographer's, chemist, or anywhere where you saw the Kodak girl, take your snaps, take the film along to be developed, and then return to collect your photographs a few days later. Or do it all yourself in the cupboard under the stairs.
 However the Calotype, even though simpler to produce than
the Daguerreotype, did not replace the latter. This was partly because
Fox Talbot patented his Calotype process as
However the Calotype, even though simpler to produce than
the Daguerreotype, did not replace the latter. This was partly because
Fox Talbot patented his Calotype process as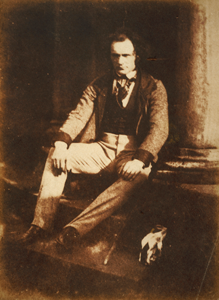 Louis Daguerre had not (but see above). His generous offer to' lovers of
science and nature' quoted above was misleading to say the least, as Fox
Talbot through many lawsuits and bitter correspondence did all he
could to preserve a monopoly of his invention. Calotypes also produced a
less clear image than Daguerretypes since producing a print was made by
passing light through a paper negative resulting in the texture and fibre of
the paper being visible in the final prints; they thus had less clarity
than had the Daguerreotypes .
Louis Daguerre had not (but see above). His generous offer to' lovers of
science and nature' quoted above was misleading to say the least, as Fox
Talbot through many lawsuits and bitter correspondence did all he
could to preserve a monopoly of his invention. Calotypes also produced a
less clear image than Daguerretypes since producing a print was made by
passing light through a paper negative resulting in the texture and fibre of
the paper being visible in the final prints; they thus had less clarity
than had the Daguerreotypes .Fox Talbot initially sold licences for his patent for £20 but this was later lowered for amateurs to £4, although professionals had to pay £300 annually. Wealthy people like Fox Talbot clearly had no conception of the means of less privileged people: a labourer in 1850 - although admittingly the earning the lowest wage - earned £20 per annum! £4 in 1850 is equivalennt to £500 today, and you can buy a very sophisticated digital camera for £500 today. Thank goodness that times have changed.
Fox Talbot was widely criticized for his patenting the Calotype process. In his time patent holders were attacked for enforcing their rights and the academic world regarded patenting new discoveries as a hindrance to scientific freedom and further development. On the other hand many scientists approved of this patent, although, it must be added, the Calotype process was free for scientific usage. This did not mean that people did not take calotypes without a licence as the materials were easily obtained and it was a much easier process to use than that of Daguerreotypes
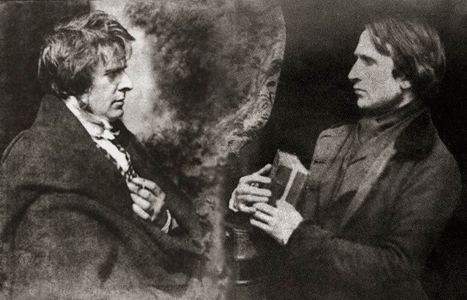
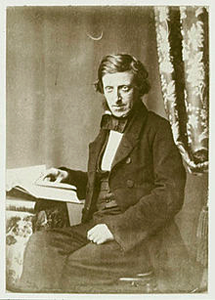
However English patent law did not run to Scotland where a number of Calotype studios opened. The first, and possibly the most famous of these, was Hill and Adamson opened by the painter David Octavious Hill and engineer Robert Adamson in 1843. Their work is of great interest as they took their camera out of the studios taking photographs of working people in the vicinity, of fisherfolk, soldiers from the local garrison and other working people; this is in contrast to many of the early photographs of middle and upper class people dressed in their finery. Fox Talbot, the owner of the patent took many photographs himself of course but the general opinion is that these are of little artistic merit. Right is a Calotype of the Scottish painter Thomas Duncan from the early studio and to the right is a composite of Mr Hill and Mr Adamson themselves.
In 1853 - 12 years after the Calotype was first introduced - this patent was finally lifted. But by then another process - the wet colloiden process - had been introduced in 1854 (see below)
| D. I. Y. Albumen Prints | |
| 1. | Coat a sheet of paper - preferably made from 100% cotton - and coat it with an emulsion of albumen (egg white) and sodium or ammonium chloride. This has the effect of sealing the paper and creating a glossy surface. |
| 2. | Dip the paper on silver nitrate solution. This gives the paper a light sensitive coating - but especially to ultra-violet light. Sodium chloride in the albumen forms silver chloride in contact with silver nitrate. |
| 3. | Dry |
| 4. | Place the paper in a frame directly in contact with the negative; the latter traditionally of glass with colloidal emulsion |
| 5. | Now expose to light until the desired level of exposure can be seen. Direct sunlight was originally used but later ultra-violet light was employed as the paper, as mentioned above, is much more sensitive to ultra-violet light. |
| 6. | Fix the image in a bath of 'hypo'. |
Note that there is no chemical development of the latent image in this process: the image forms in contact with the negative; the print is thus referred to as a printed rather than a developed photograph.
Albumen printing was the first exploitable method of producing a prints on paper from a negatives from 1855 until the beginning of the 20th century.
In 1851 at his home town of Lille, Nord, Northern France, on the border with Belgium, M. Blanquart-Evrard, with one Hippolyte Fockeday, started the first large scale printing organization and introduced many talented photographers to the public. However the prints were still produced from Calotypes which produced blank white skies and darkened foreground to overcome which artist would take the photographs of clouds in the morning and the foregrounds in the afternoon combining them to produce composites. The photographs were found to fade after a name and the business closed in 1855 giving way to the competition of lithographs.
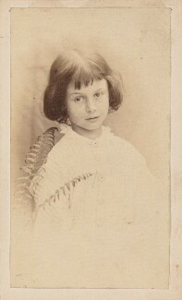
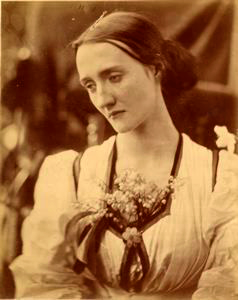
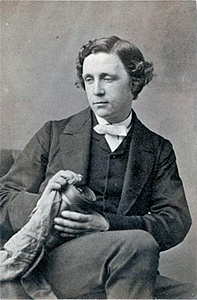
On the right an albumen print of Louis Désiré Blanquart-Evrard, produced by the inventor, looks into the text while on the left is such a print of Alice Liddell (the original Alice) taken by Lewis Carroll himself.
 whom few people have
actually heard. He could
not be more of a contrast to the villain: he was the son of a butcher
from Hertfordshire, who begin his working life as an apprentice to a
silver/goldsmith but later trained at the Royal Academy as a sculptor. He
would use the Calotype process to record his work but he found the poor
definition and contrast, as well as the still rather long exposure time
of the process unsatisfactory. So he developed his own process - the Wet
Collodion Process - in 1848 and published this process in The
Chemist -1 in 1854. Mr Archer deliberately did not
patent his invention but rather wished it to be 'a gift to the
world'. This process was a major
breakthrough which combined the sharp images of the Daguerreotype with
the ability to be reproduced of the Calotype. Soon the Calotype was gone
and eventually the Daguerreotype too, the Wet Collodion Process being the
photographic technique used by the Victorians. As Mr Archer had
deliberately not patented the process, its use proliferated and it was
possible for others to make variations of it. Unfortunately Mr Archer
died impoverished at the early age of forty-four, having made no money from his invention.
whom few people have
actually heard. He could
not be more of a contrast to the villain: he was the son of a butcher
from Hertfordshire, who begin his working life as an apprentice to a
silver/goldsmith but later trained at the Royal Academy as a sculptor. He
would use the Calotype process to record his work but he found the poor
definition and contrast, as well as the still rather long exposure time
of the process unsatisfactory. So he developed his own process - the Wet
Collodion Process - in 1848 and published this process in The
Chemist -1 in 1854. Mr Archer deliberately did not
patent his invention but rather wished it to be 'a gift to the
world'. This process was a major
breakthrough which combined the sharp images of the Daguerreotype with
the ability to be reproduced of the Calotype. Soon the Calotype was gone
and eventually the Daguerreotype too, the Wet Collodion Process being the
photographic technique used by the Victorians. As Mr Archer had
deliberately not patented the process, its use proliferated and it was
possible for others to make variations of it. Unfortunately Mr Archer
died impoverished at the early age of forty-four, having made no money from his invention.The Wet Collodion Process would itself be superseded by others at the beginning of the twentieth century but like the Daguerreotype (but not the Calotype) it would also experience a later revival.
-1 This was presumably a professional journal of the time but I have been unable to find any reference to it. The only journal of that title I have found was first published in 1923 and is still around.
| D. I. Y. The Collodion Process | |
| Part One: Making Collodion I have not given the various quantities of the constituents as I very much doubt if anyone will wish to attempt this. For the bold, the details may be found on the internet |
|
| 1. | Dissolve pyroxylin (also called nitrocellulose) in a mixture of diethyl ether and ethyl alcohol. |
| 2. | Dissolve zinc bromide in alcohol and add a few drops of nitric acid. |
| 3. | Add this latter to half of the collodion produced in 1. |
| 4. | Dissolve silver nitrate in water and alcohol mix. |
| 5. | Pour the above into the other half of the collodion produced in 1. |
| 6. | Then drop the bromidized collodion produced in step 3 into the above. Stir slowly. We now have an emulsion of silver bromide. |
| 7. | Leave this emulsion for 10 - 20 hours. It is then ready for use. It may be preserved and reactivated later. |
| Part Two: Taking the Photograph | |
| 1. | Clean the glass plate - extremely well |
| 2. | Pour the prepared collodion onto the plate, tilting the plate until it reaches each corner |
| 3. | Now take the plate into the dark room (mobile or otherwise) or into a portable orange tent, as the surface that we are going to prepare is only sensitive to blue and ultra-violet light, and immerse the plate into a sensitizing bath of silver nitrate for 3- 5 minutes |
| 4. | Lift out the plate, drain and wipe the back; then load into a plate holder. |
| 5. | Load the plate holder into the camera and withdraw the dark slide of the former. |
| 6. | Expose the plate by removing the lens cap. |
| 7. | Develop the plate using a ferrous sulphate based developer. |
| 8. | Fix the plate with potassium cyanide or sodium thiosulphate. All of this must be carried out within 10-15 minutes. |
| Part Three: Finishing | |
| 1. | Dry the plate |
| 2. | Varnish with sandarac, alcohol, and lavender oil solution. |
| 3. | Print the negative by the Albumen Process described earlier. |
 |
 |
|
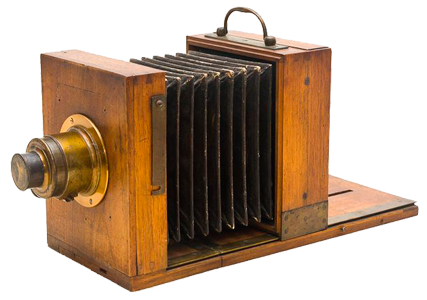
| A Victorian Camera Suitable for the Wet Collodiod Process |
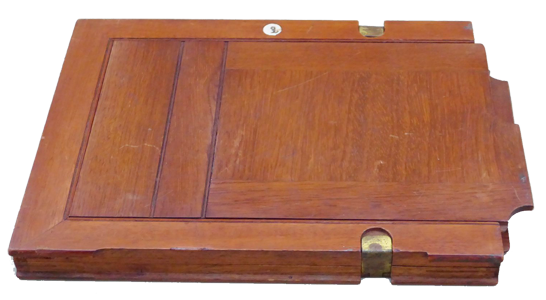
A Plate Holder When the clips at the side are released, the plate holder may be opened like a book. The dark slide in moveable front piece. The are two of these so two plates may be loaded together. |
| THE WET COLLODION PROCESS | ||
| ADVANTAGES | DISSADVANTAGES | |
| The process produced a negative image on glass. | The entire process from the coating of the plate must be done before the plate dries - 10-15 minutes | |
| In theory it is possible to produced an indefinite series of Albumen Prints with this method. | Silver nitrate causes staining and a potential build up of nitrate residues in the camera and plate holder | |
| Much less expensive than producing a Daguerreotype | The silver nitrate bath becomes gradually contaminated with alcohol, ether, bromides, and other substances, so losing its effectiveness | |
| The prints are clearer and more detailed than those produced by the Calotype Process | ||
| No polishing equipment needed as used in the Daguerreotype process | ||
| No toxic vapours are produced as in the Daguerreotype process (as long as potassium cyanide is not used!) | ||
| Glass in considerably cheaper than silver plated copper. | ||
| The exposure is fast: a few seconds only. | ||
The Wet Collodion Process - as all previous processes - only sensitive to blue and ultra-violet light: this means that reproduction in black and whites does not produce the same tones as the eye (and brain) do if you look darkly through a glass. Warm colours appear dark while cool colours appear uniformly light. We will come later to films which overcome this: orthochromatic (ordinary colours, presumably for the time) films which are insensitive to red light, and panchromatic ( all colours, on a black and white film) films which are sensitive to all colours and so produce an accurate black and white image. The former can be developed under a red safe light while the latter requires complete darkness.
Despite the disadvantages of the Wet Collodion Process, especially that of having to work quickly, it became enormously popular in its time, being used by both professional and amateur photographers, alike. In was one thing working in a studio with an adjoining darkroom but taking the equipment outside was certainly another. Nevertheless that is just what these Victorian photographers did using a variety of portable darkroome, even taking photographs in the Middle East and on battlefields. Perhaps it should not be despite the difficulties but because of the difficulties as the Victorians appear to enjoy a challenge, even a major one.
The process is shown in action very well on YouTube here. If you are interested take a look.
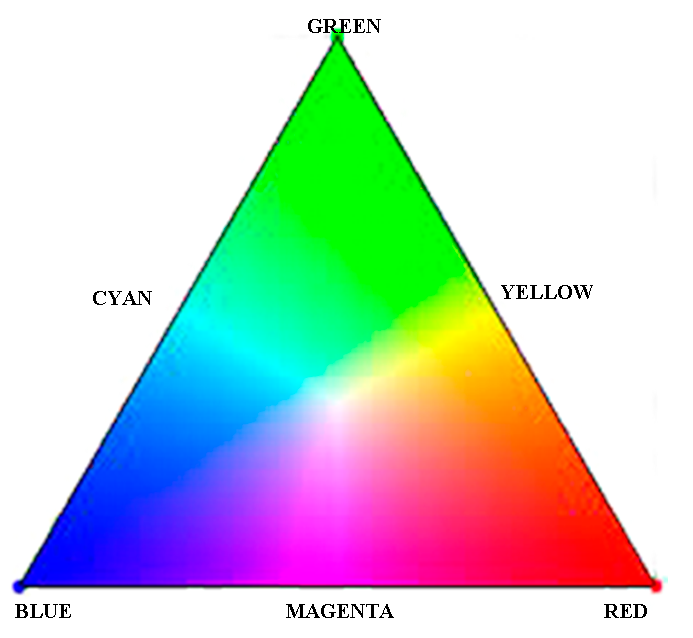
| To the right is the colour triangle for
light - not for pigments. At the apices of the triangle
are the three primary colours: Green, Red, and Blue.
Opposite each primary colour on the walls of the triangles are
the three secondary colours: Magenta, Cyan, and Yellow.
These are obtained by mixing primary coloured lights
together, not pigments. You can picture how blue and red produce magenta (a purple) and green and blue produce cyan, but green and red making yellow? It's easy to picture red and yellow making an orange and yellow and green making yellow-green, but green and red making yellow? Well it just does! Buy one of those toy spinning tops with colours and see for yourself! For now this is to show film sensitivity and safe lights. More on colour photography much later. |
 |
|
|
|
|
|
||||||||||||||||||||
.png)
Because of the inconvenience - having to prepare, expose, and develop the plate within ten minutes - many - including scientists of the day - attempted to develop a Dry Collodion Process. The methods involved coating or mixing the collodiom with a substance the prevented it drying quickly, for, as long the collodion remained partially wet it retained at least some of its sensitivity. Many materials were tried: glycerin, magnesium nitrate, tannic acid, and albumen. Other, more unlikely substances were also tried: beer, (and for the teetotal) tea, coffee, and honey.
However although dry collodion did allow the plate to be exposed hours or even a day after costing, they all rendered the plate slow so the three to ten times the exposure time of the wet plate was required.
 this produces the most satisfacory effect in the final result. The
finished negative is mounted on black velvet or painted with a black
varnish. When viewed in reflective light against this black
background, the negative appears to be a positive: this is because the
clear areas (unexposed) will appear black againt the black background
and the dark (exposed) area will appear relatively light.-1
this produces the most satisfacory effect in the final result. The
finished negative is mounted on black velvet or painted with a black
varnish. When viewed in reflective light against this black
background, the negative appears to be a positive: this is because the
clear areas (unexposed) will appear black againt the black background
and the dark (exposed) area will appear relatively light.-1Like the Deagurreotype it cannot be printed but it is a considerably cheaper process.
It was realtively short lived process being introduced in the 1850's and replaced by the Tintype a decade later.
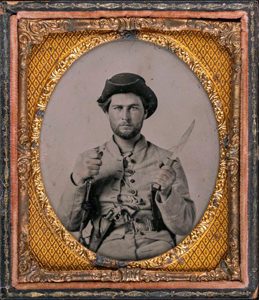
Right is an ambrotype of Private James House, an American Confederate soldier of the 16th Georgia Cavalry of the Army of Tennessee. A young man proudly showing his weapons.
| D. I. Y. Ambrotype | |
| 1. | Thoroughly clean a glass plate |
| 2. | Coat the plate with a thin layers of iodized collodion; this is presumably similar to that described in The Collodion Process (above) except zinc iodide is used instead of zinc bromide. |
| 3. | In the dark dip the plate into a silver nitrate solution. |
| 4. | Load the plate in the dark into a plate holder. |
| 5. | Insert the plate holder in the camera, as before, and expose the plate. The is deliberately an underexposre and is 5 - 60 seconds |
| 6. | Develop the plate as before |
| 7. | Fix the plate as before |
| 8. | When dry back the plate with black velvet or paint with a black varnish |
| 9. | Place another glass plate over the fragile emulsion and mount in a metal frame. |
-1 I've never actually seen this effect as perhaps my old 35mm negatives are too small and correctly exposed to produce it. I presume that 'relatively light' means an illusion rather like that which is seen when your gray television screen appears black where is should when a programme is being received; there is no black light!
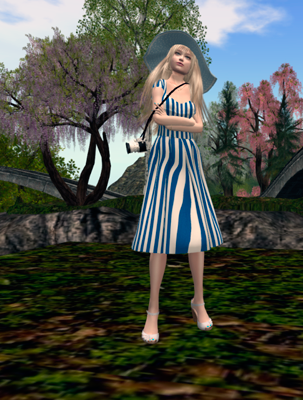
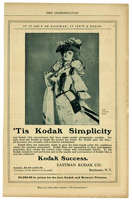
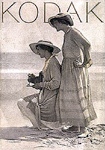
The interesting tale of Georgia, the bikini clad cut out Kodak girl many of us remember, will be told in due course.
Below is my own Kodak girl wearing the to become famous Kodak dress; I did seek a suitable model but was unsucessful so I am afraid she is a girl from a virtual world.